Whip Up a Dazzling Last-Minute Painted Pumpkin Thanksgiving Centerpiece
I love a pretty Thanksgiving table, but sometimes I wait until the last-minute to pull everything together. Lucky for all of us, these DIY painted pumpkins are as cute as they are easy — I can’t tell you how many compliments I’ve gotten on this colorful confetti-inspired trio!
So if you’re staring down at your own table wondering how you’re going to fancify it fast for the upcoming feast, then this is the project for you! I promise: These painted pumpkins are quick, easy, and look way more expensive and time-consuming than they actually are.
Grab your paint brush and let’s dive into this festive, fun, and fantastically easy tutorial that’ll have your Thanksgiving table looking like a masterpiece in no time!
Check out a short video here: https://youtube.com/shorts/TSTcuYi9yXI?feature=share
P.S. Did you wait until the very last minute? Here’s a quick clip taking you through the entire DIY Painted Pumpkin Process.
Painted Pumpkin Supplies
Don’t this list intimidate you! This project is incredibly flexible and forgiving. No white pumpkins? Use real ones. Have a herd of little helpers running around? Hand them a paint brush, too. Out of time to buy paint? Head to your craft closet and clear out your stash! Wherever you are on your pumpkin crafting journey, this project can be fun and successful!
Here are the supplies I used for my painted pumpkins:
- White crafting pumpkins in varying sizes
- White spray primer
- Paint Brushes (you can just use one, but having several makes this project go much faster. I used a mix of 0.5″-1″ brushes and Filbert brushes.)
- Pumpkin paint* (I used leftover spray paint and craft-store acrylic paint simiar to this.)
- White acrylic paint for the stem
- Gold treatment for the stem: Either metallic gold acrylic paint or Mod Podge & Gold Leaf Flakes
*I actually began calling these my paint-stash pumpkins because they were so great for using up left-over paint I had on hand. However, if you have a specific vision or color scheme in mind, go ahead and lean in — I’d recommend using at least 5 colors, but I used about 12.
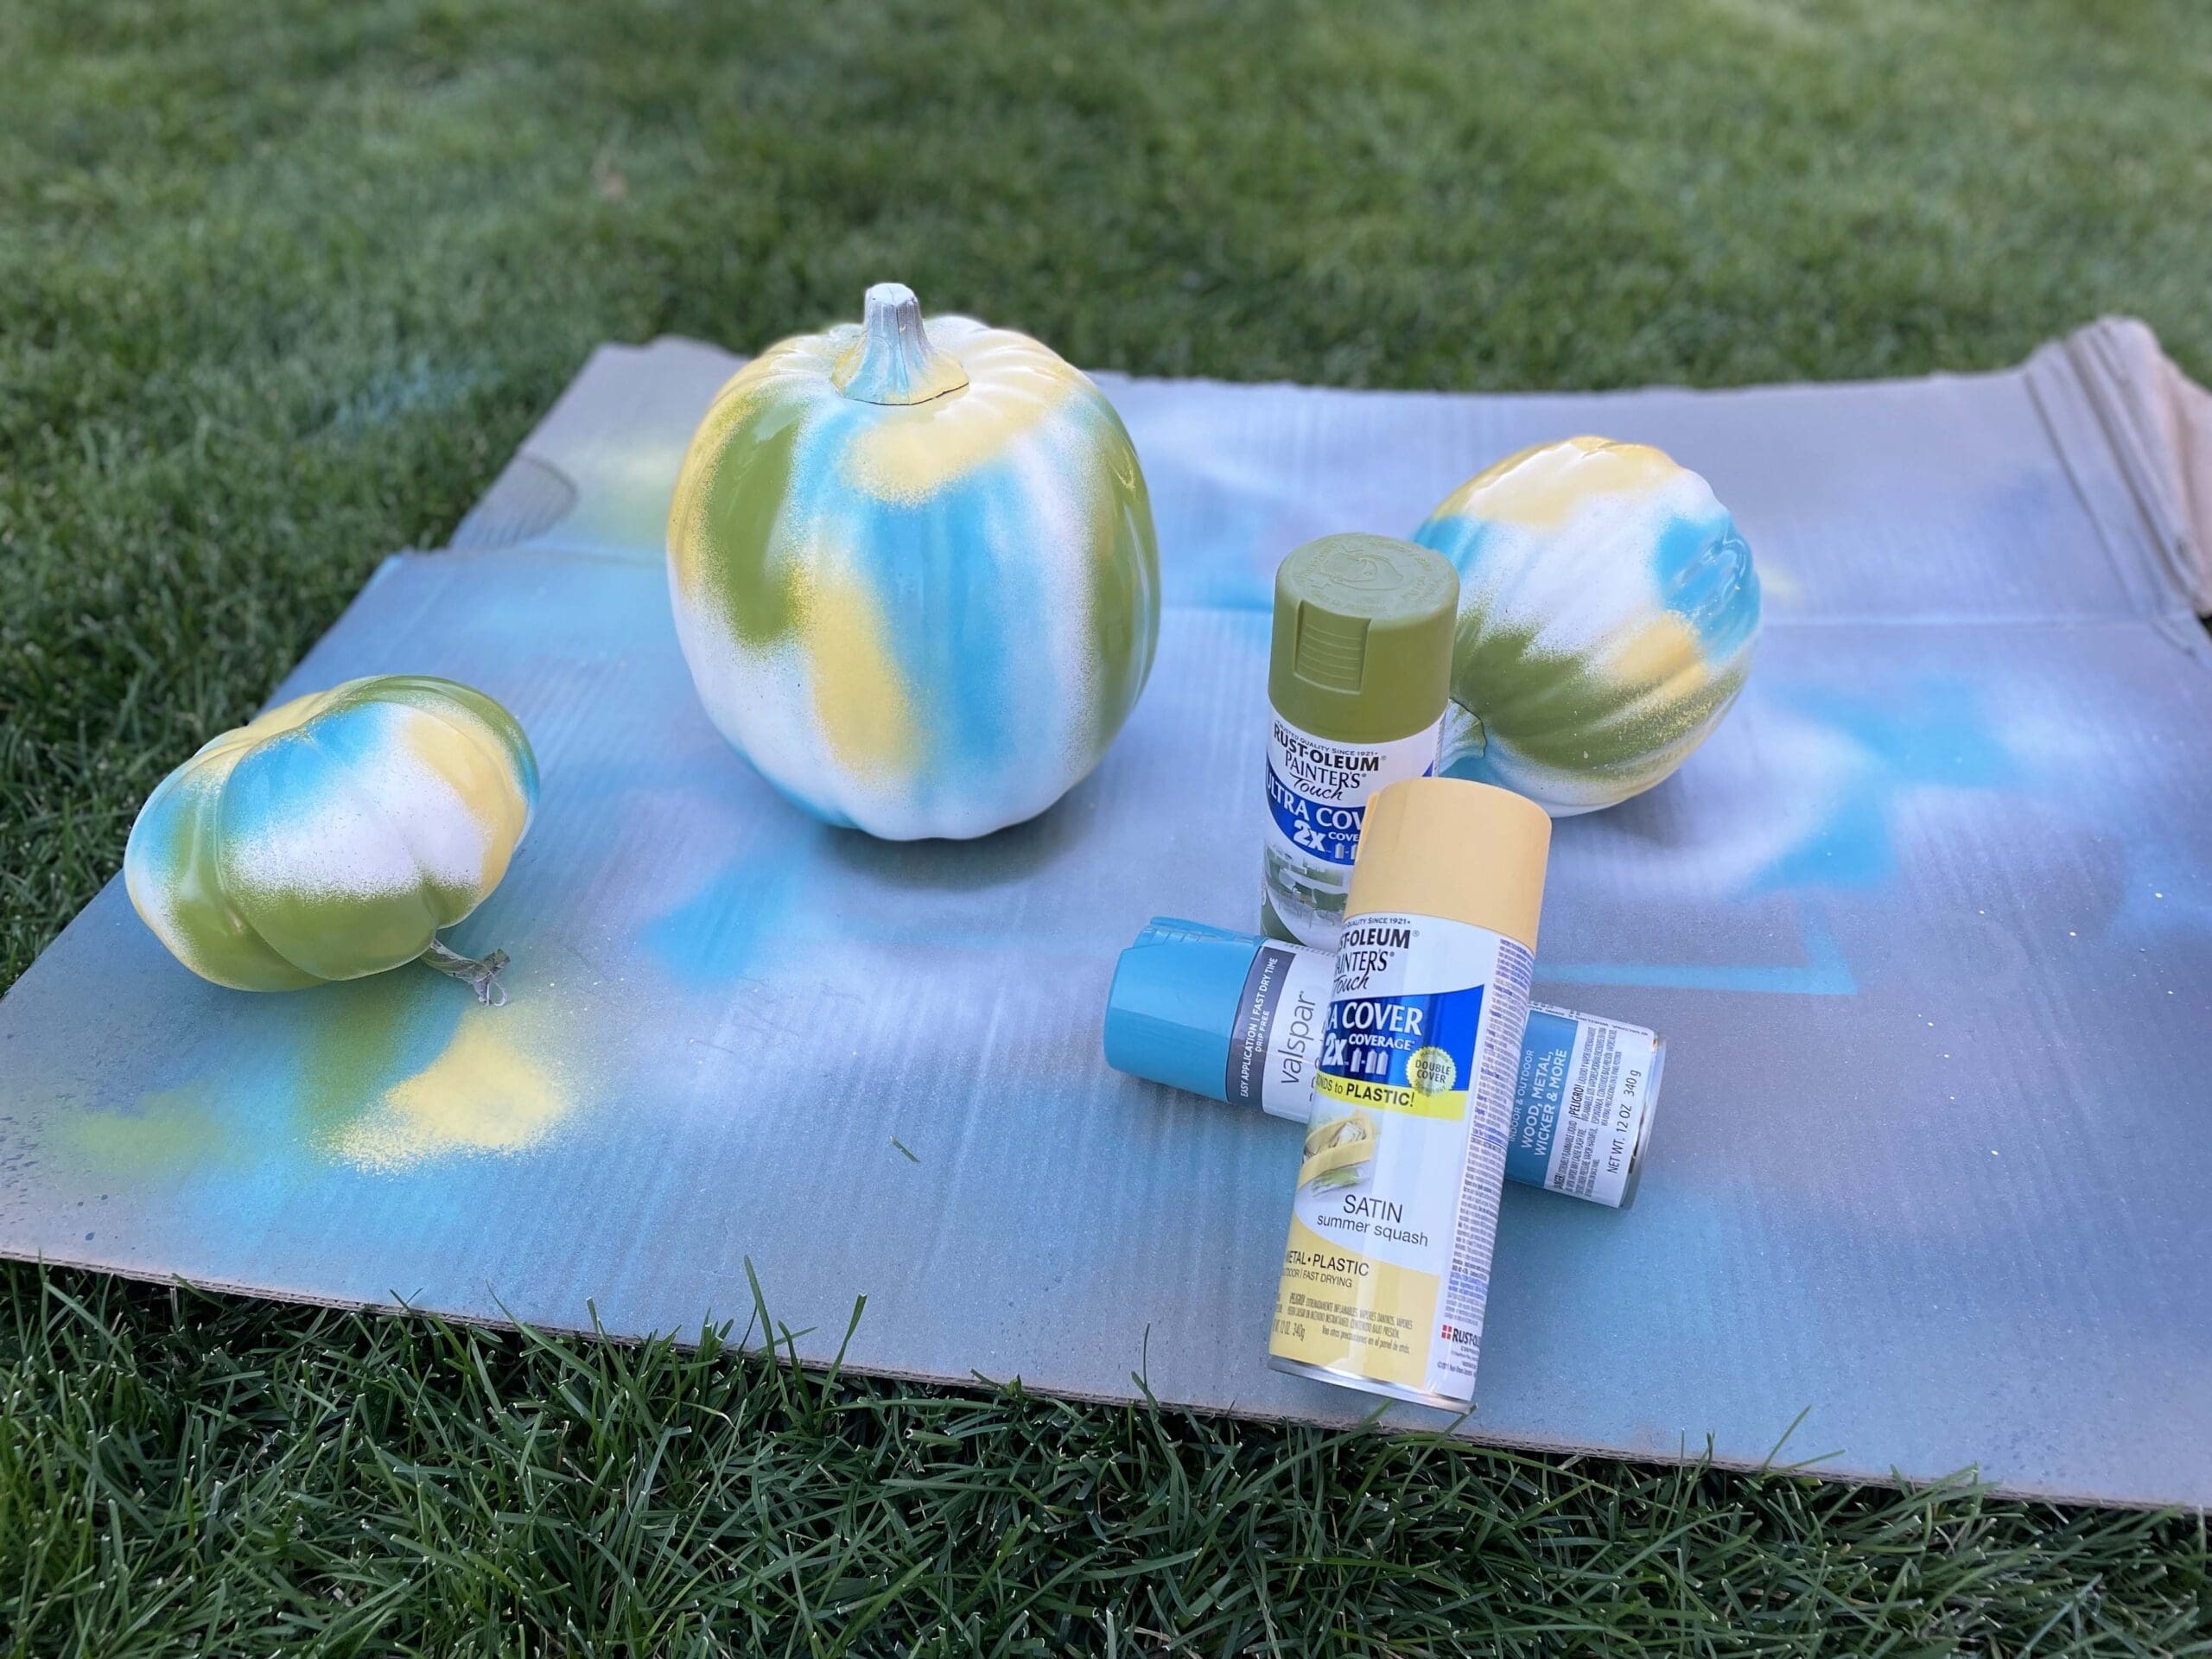
Step 1: Prime Your Pumpkins

I used a white spray primer I had on-hand to coat the entire pumpkins — stem, body, and bottom — then I let them dry.
PRO TIP: I know, I know… you’re short on time. But don’t skip this step! Craft pumpkins tend to be a bit shiny and slick. Without a solid layer of primer, you risk all of your hard work and many paint layers peeling off… which will be sad for you and any nearby side-dishes.
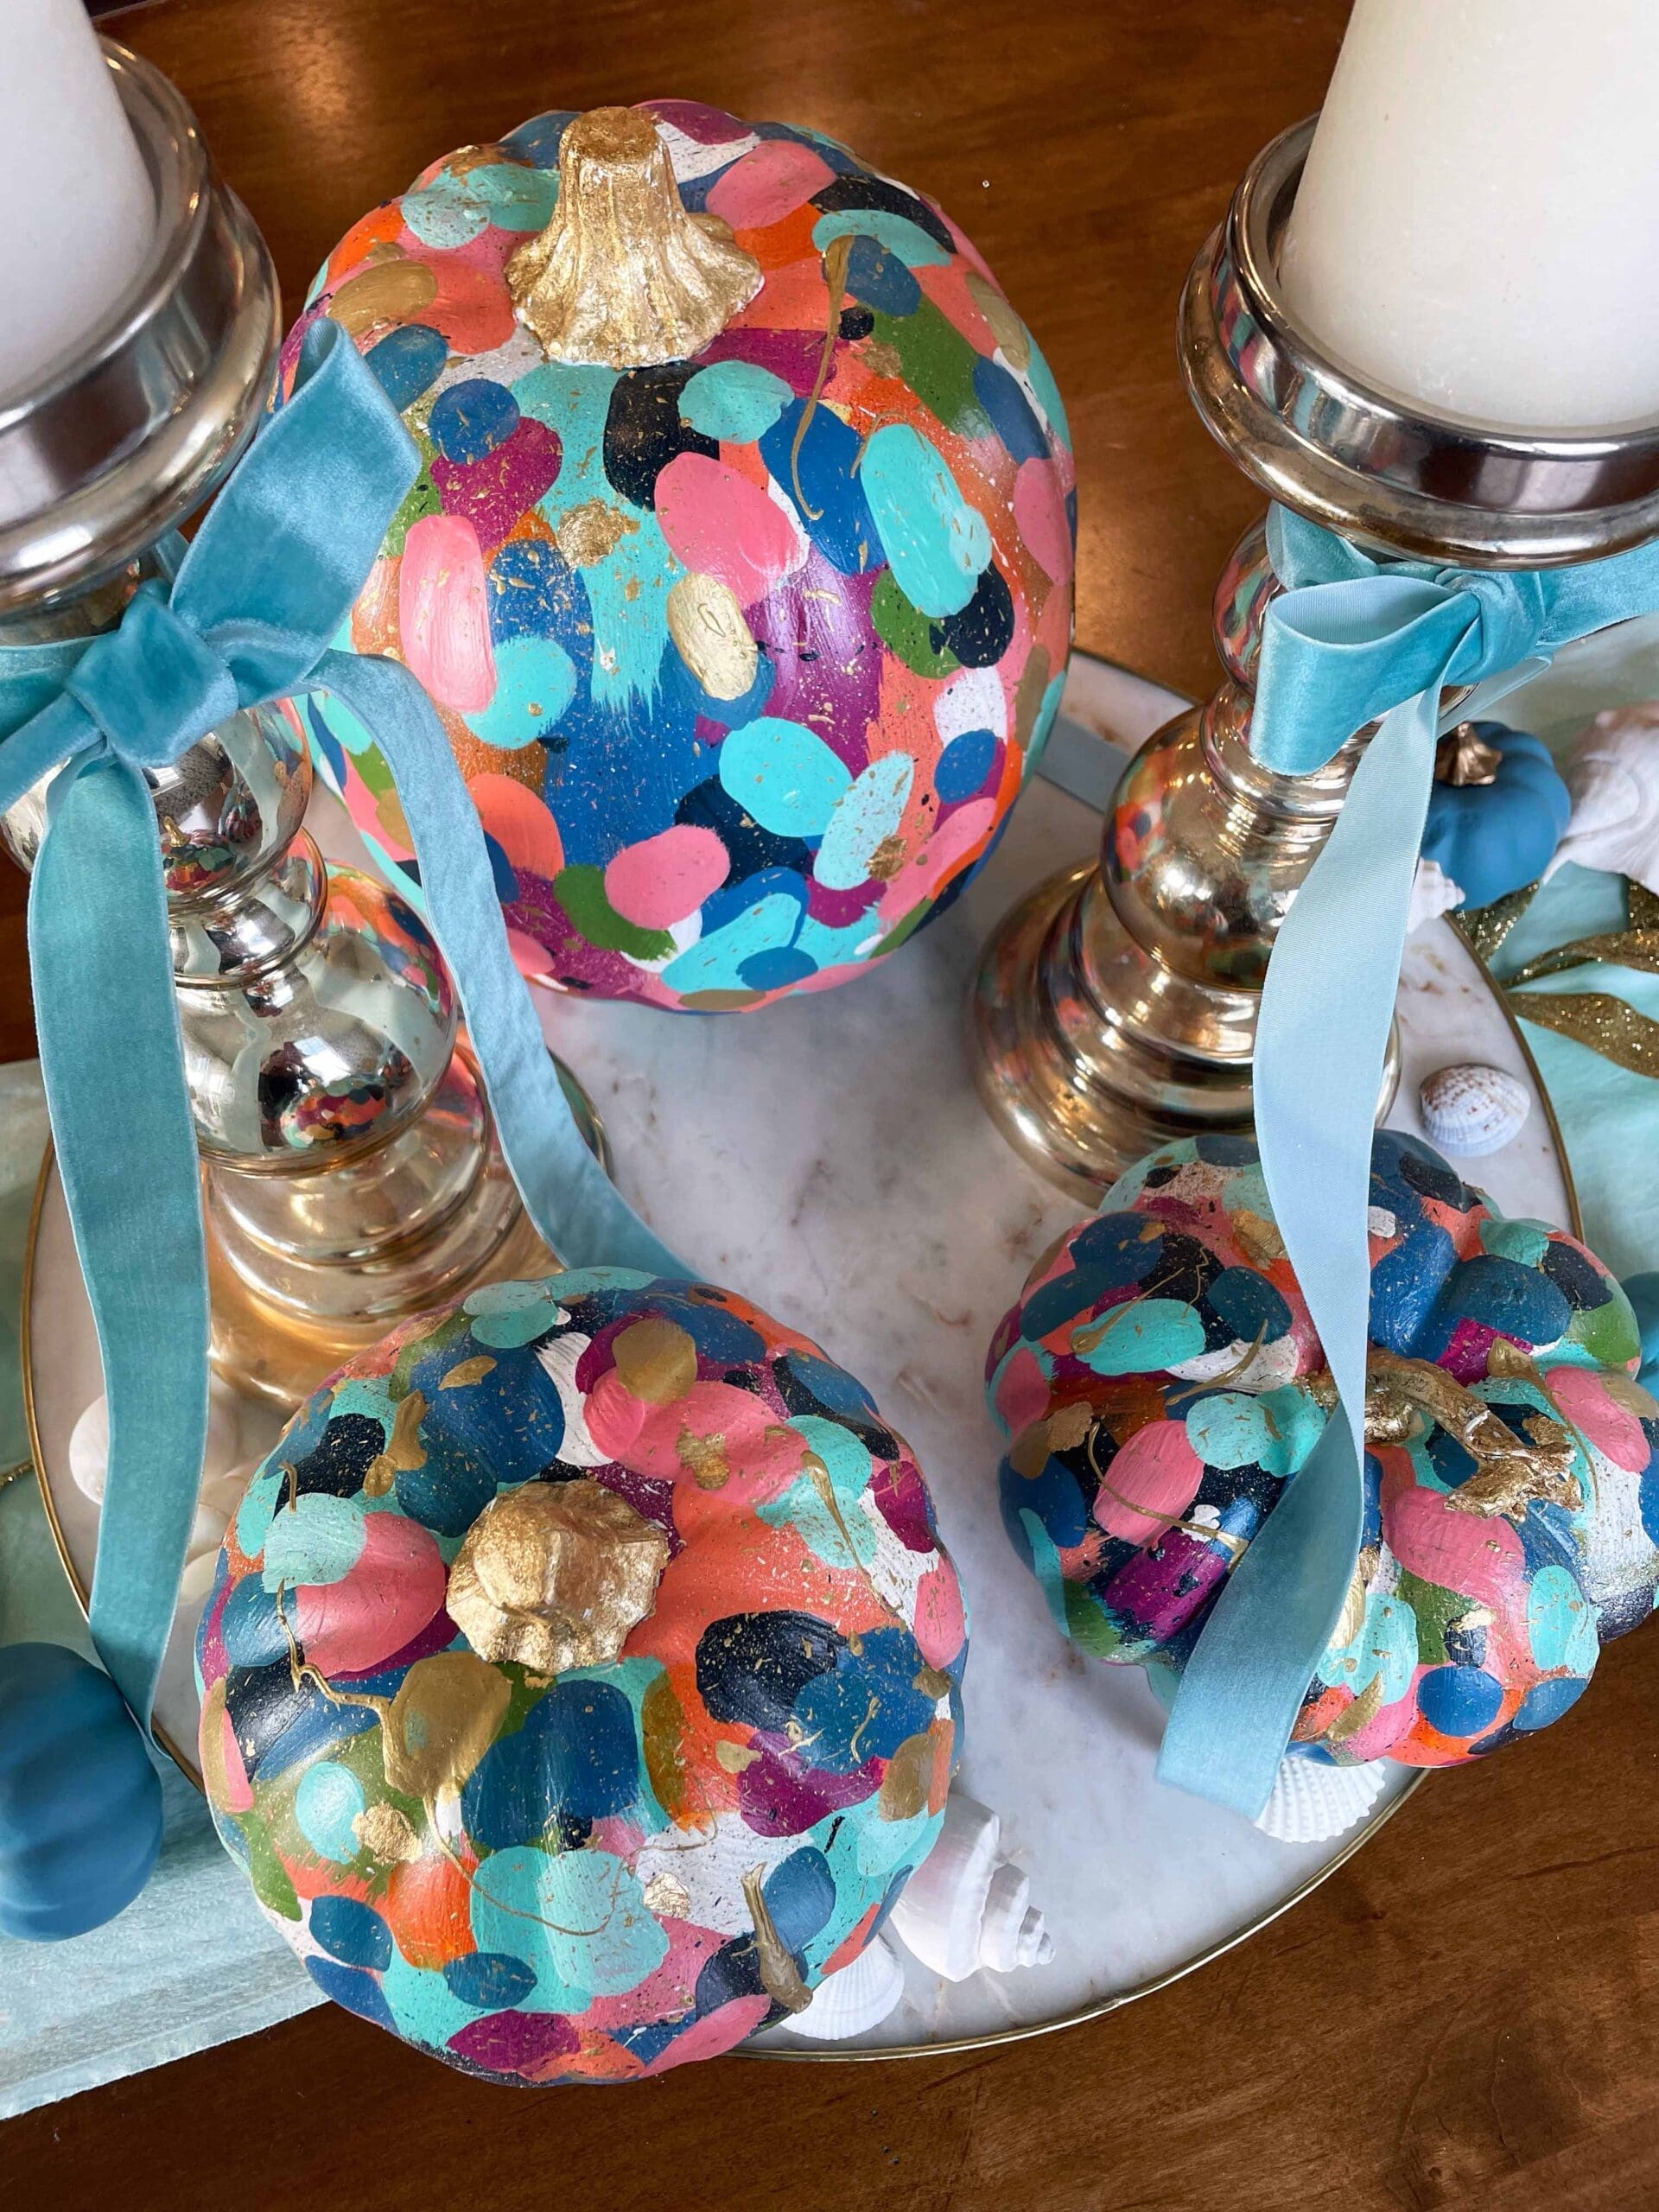
Step 2: Add Color
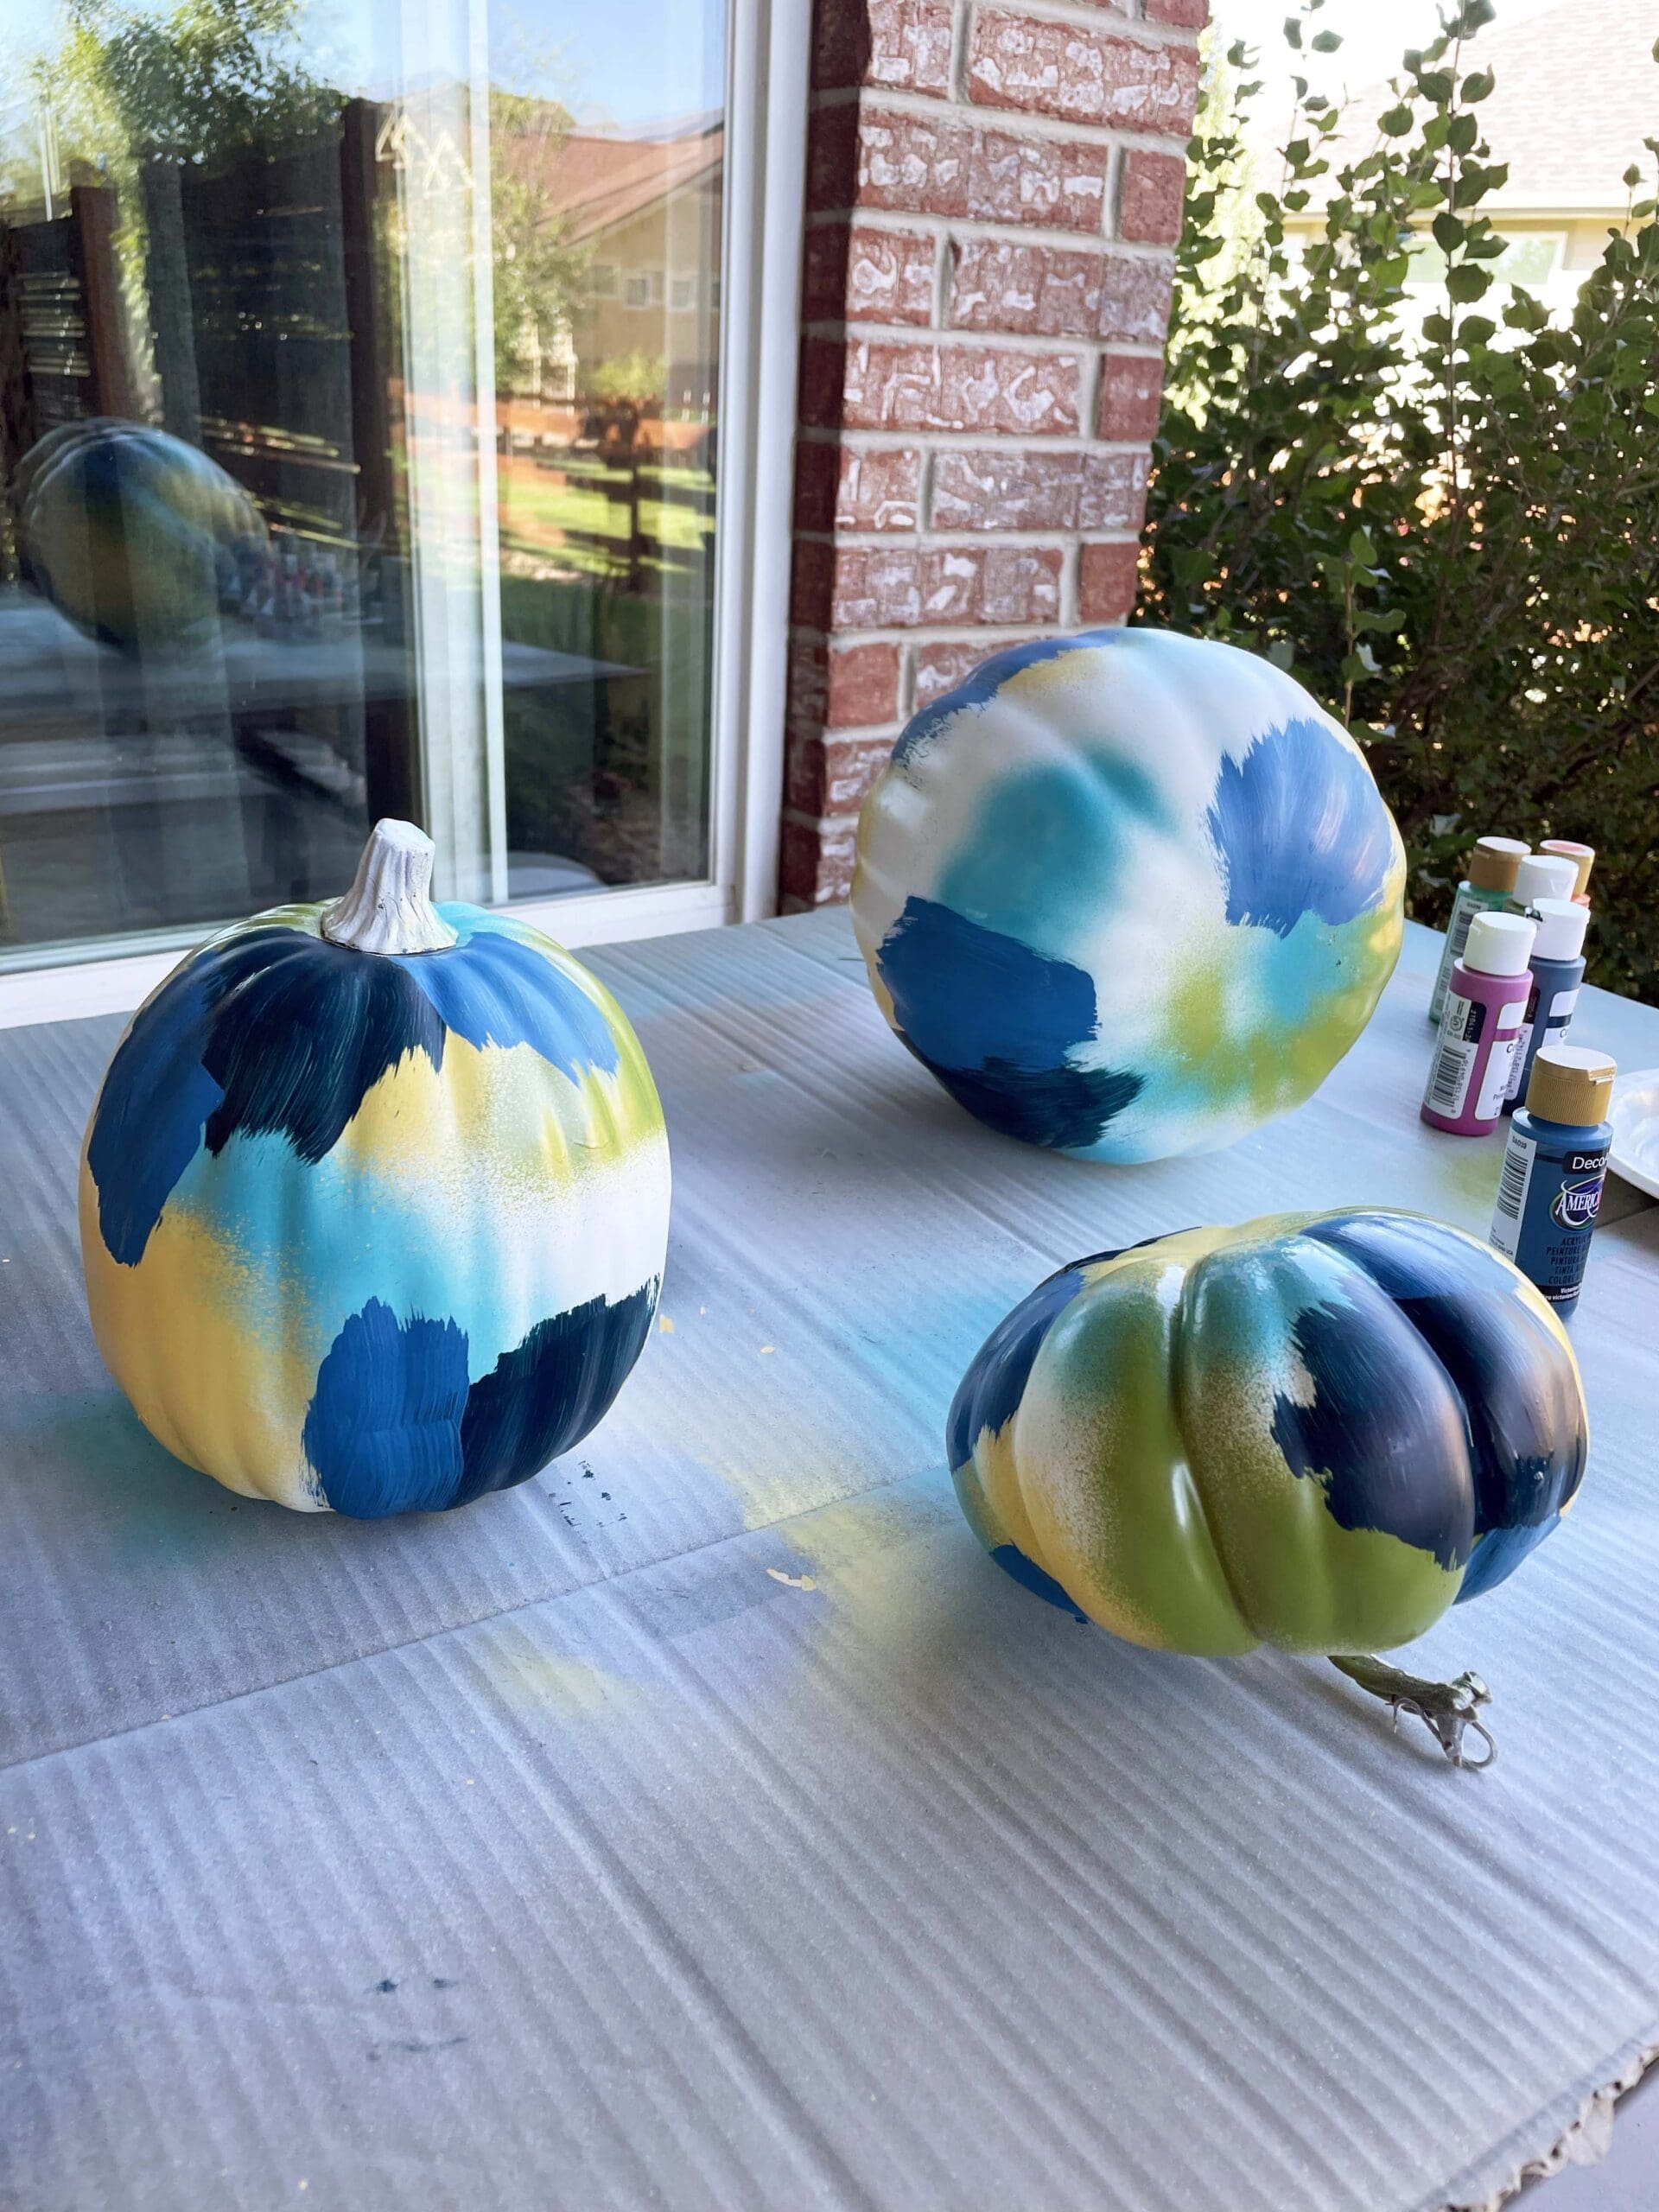
First, I added a few bold, random strokes of spray paint to give my pumpkins a colorful foundation. I used a mix of turquoise, yellow, and green (because — you guessed it — that’s what I found in my basement). Once that was dry to the touch, I began adding layers of acrylic paint.
There’s no right or wrong technique for this! I used a 0.5-inch brush to add larger strokes for my first couple of base layers, and then I switched to a rounded-tip Filbert to narrow them down to a smaller, more confetti-like strokes.
I used several brushes and colors at once so I could keep adding and layering as I went.
NOTE: Ignore the stem for now — we’ll get to that in a minute! Also, if you’re wondering, “How in the heck do I paint the bottom?!” The answer is, you don’t! Or, more accurately, you don’t have to. I carried some of my colors down around the base so it wouldn’t look completely bare, but because I plan on staging my pumpkins upright I didn’t stress about getting all of the layers painted perfectly on the bottom.
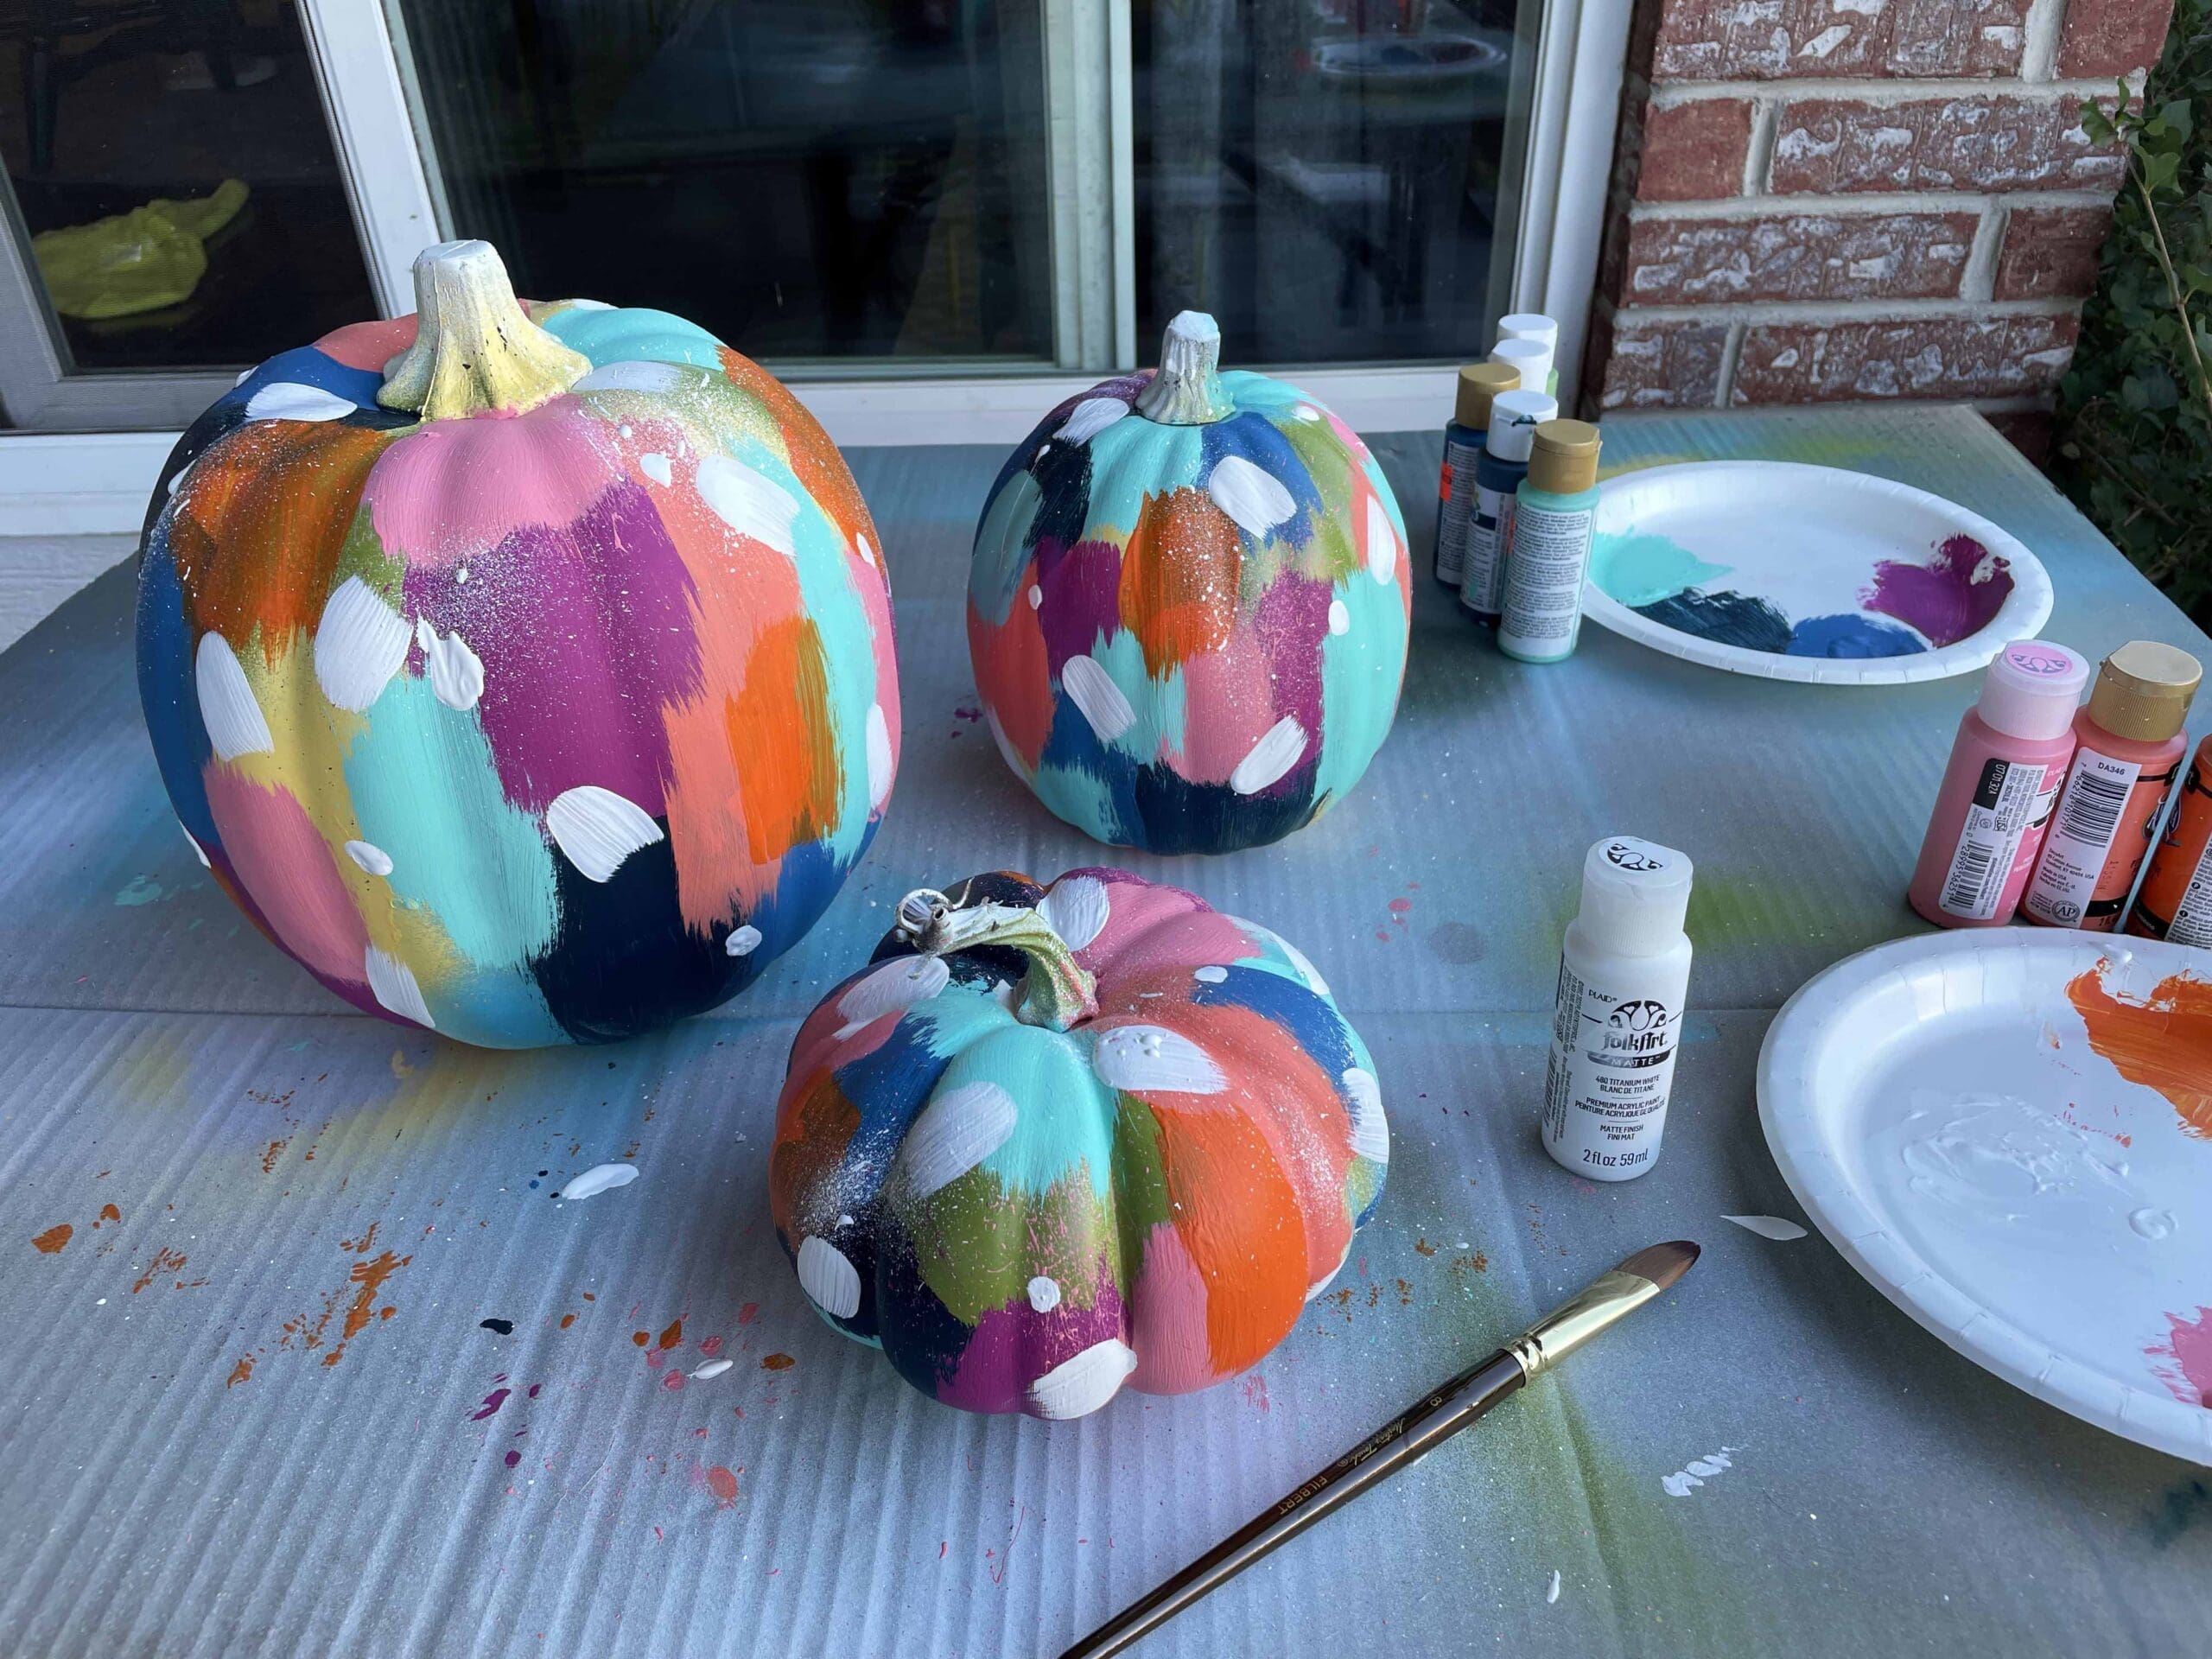
Step 2: Add More Color — and Texture!

Let your layers dry to the touch between coats. This doesn’t take long. As you work your way around, be sure to leave some of the lower layers peeking around and through your strokes.
During and between layers, I added a few drips and splatters for texture. While this is completely optional, I like the way this gives the pumpkins a more artistic, layered feel.
If you opt to add splatters, I recommend using a stiff-bristle brush (or even a toothbrush). You just have to decide if you want to get yourself messy, or everything around you messy…
Start by fully-loading your brush with the color of your choice and either fling it at your pumpkin, or use your fingers to gently flip the bristles, directing the spray toward the tops and edges of your pumpkins.
NOTE: I did not add splatters in every color — I only used white, pink, dark blue, and gold to add a little dimension.
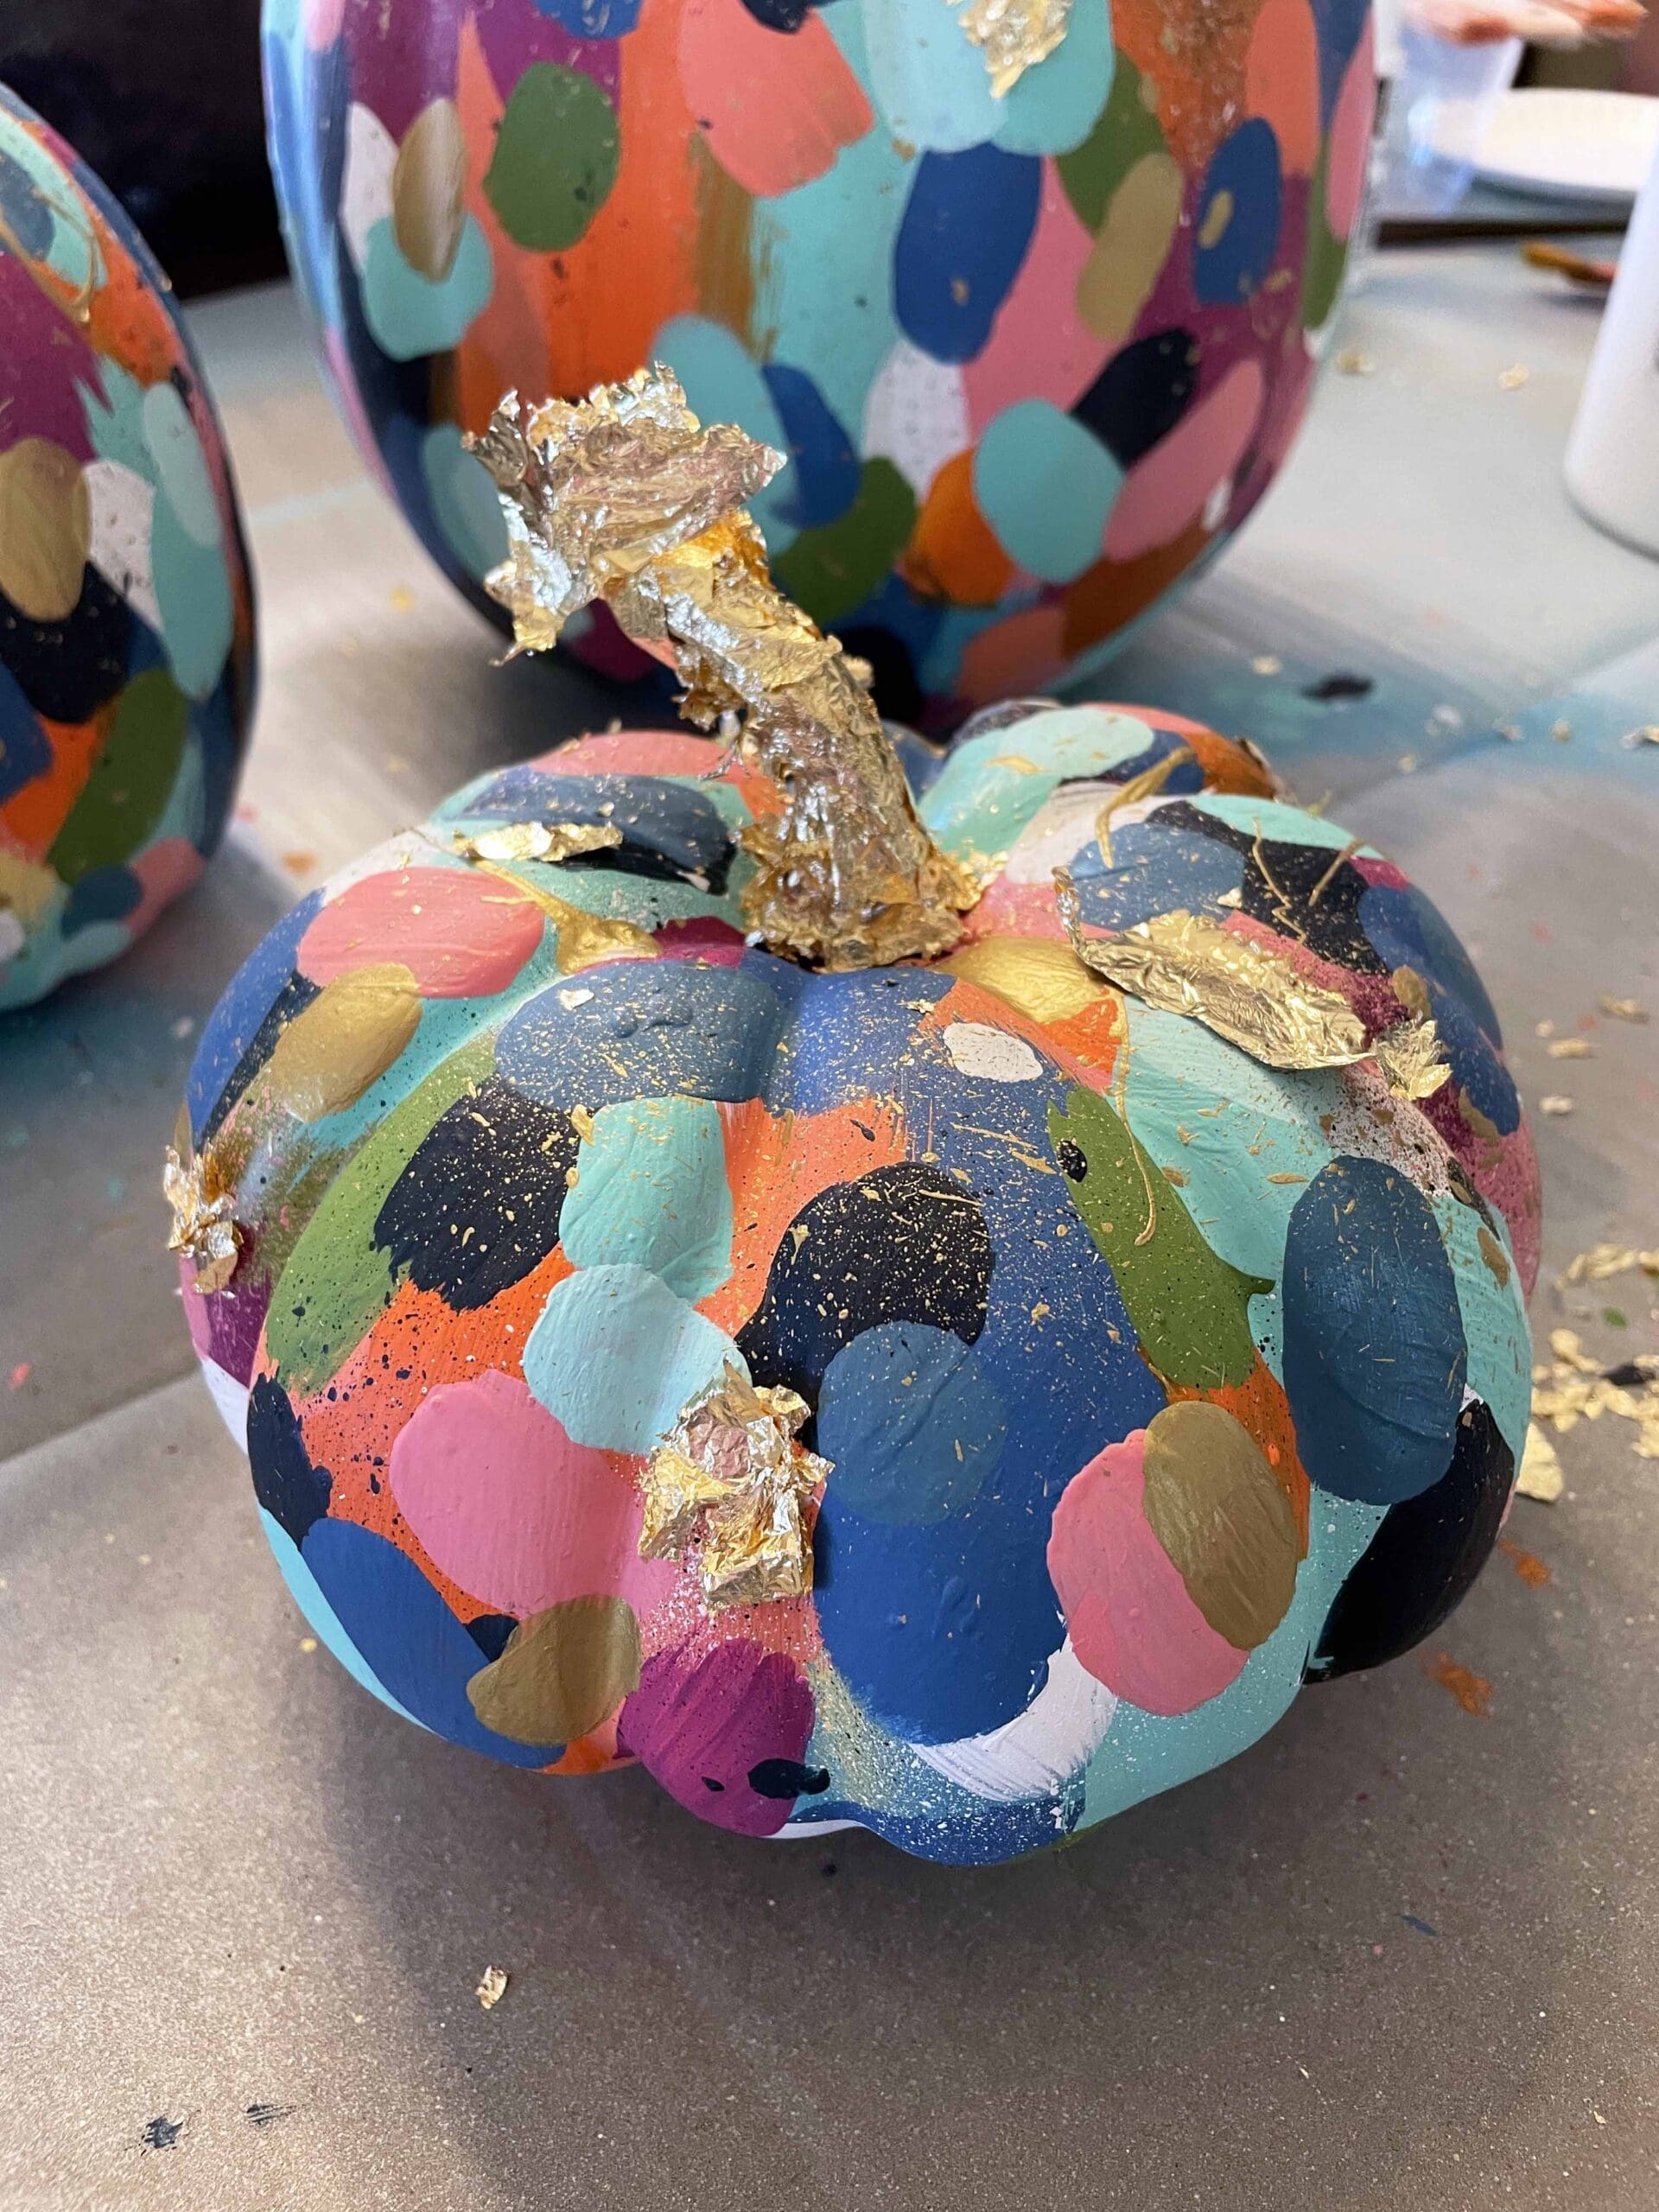
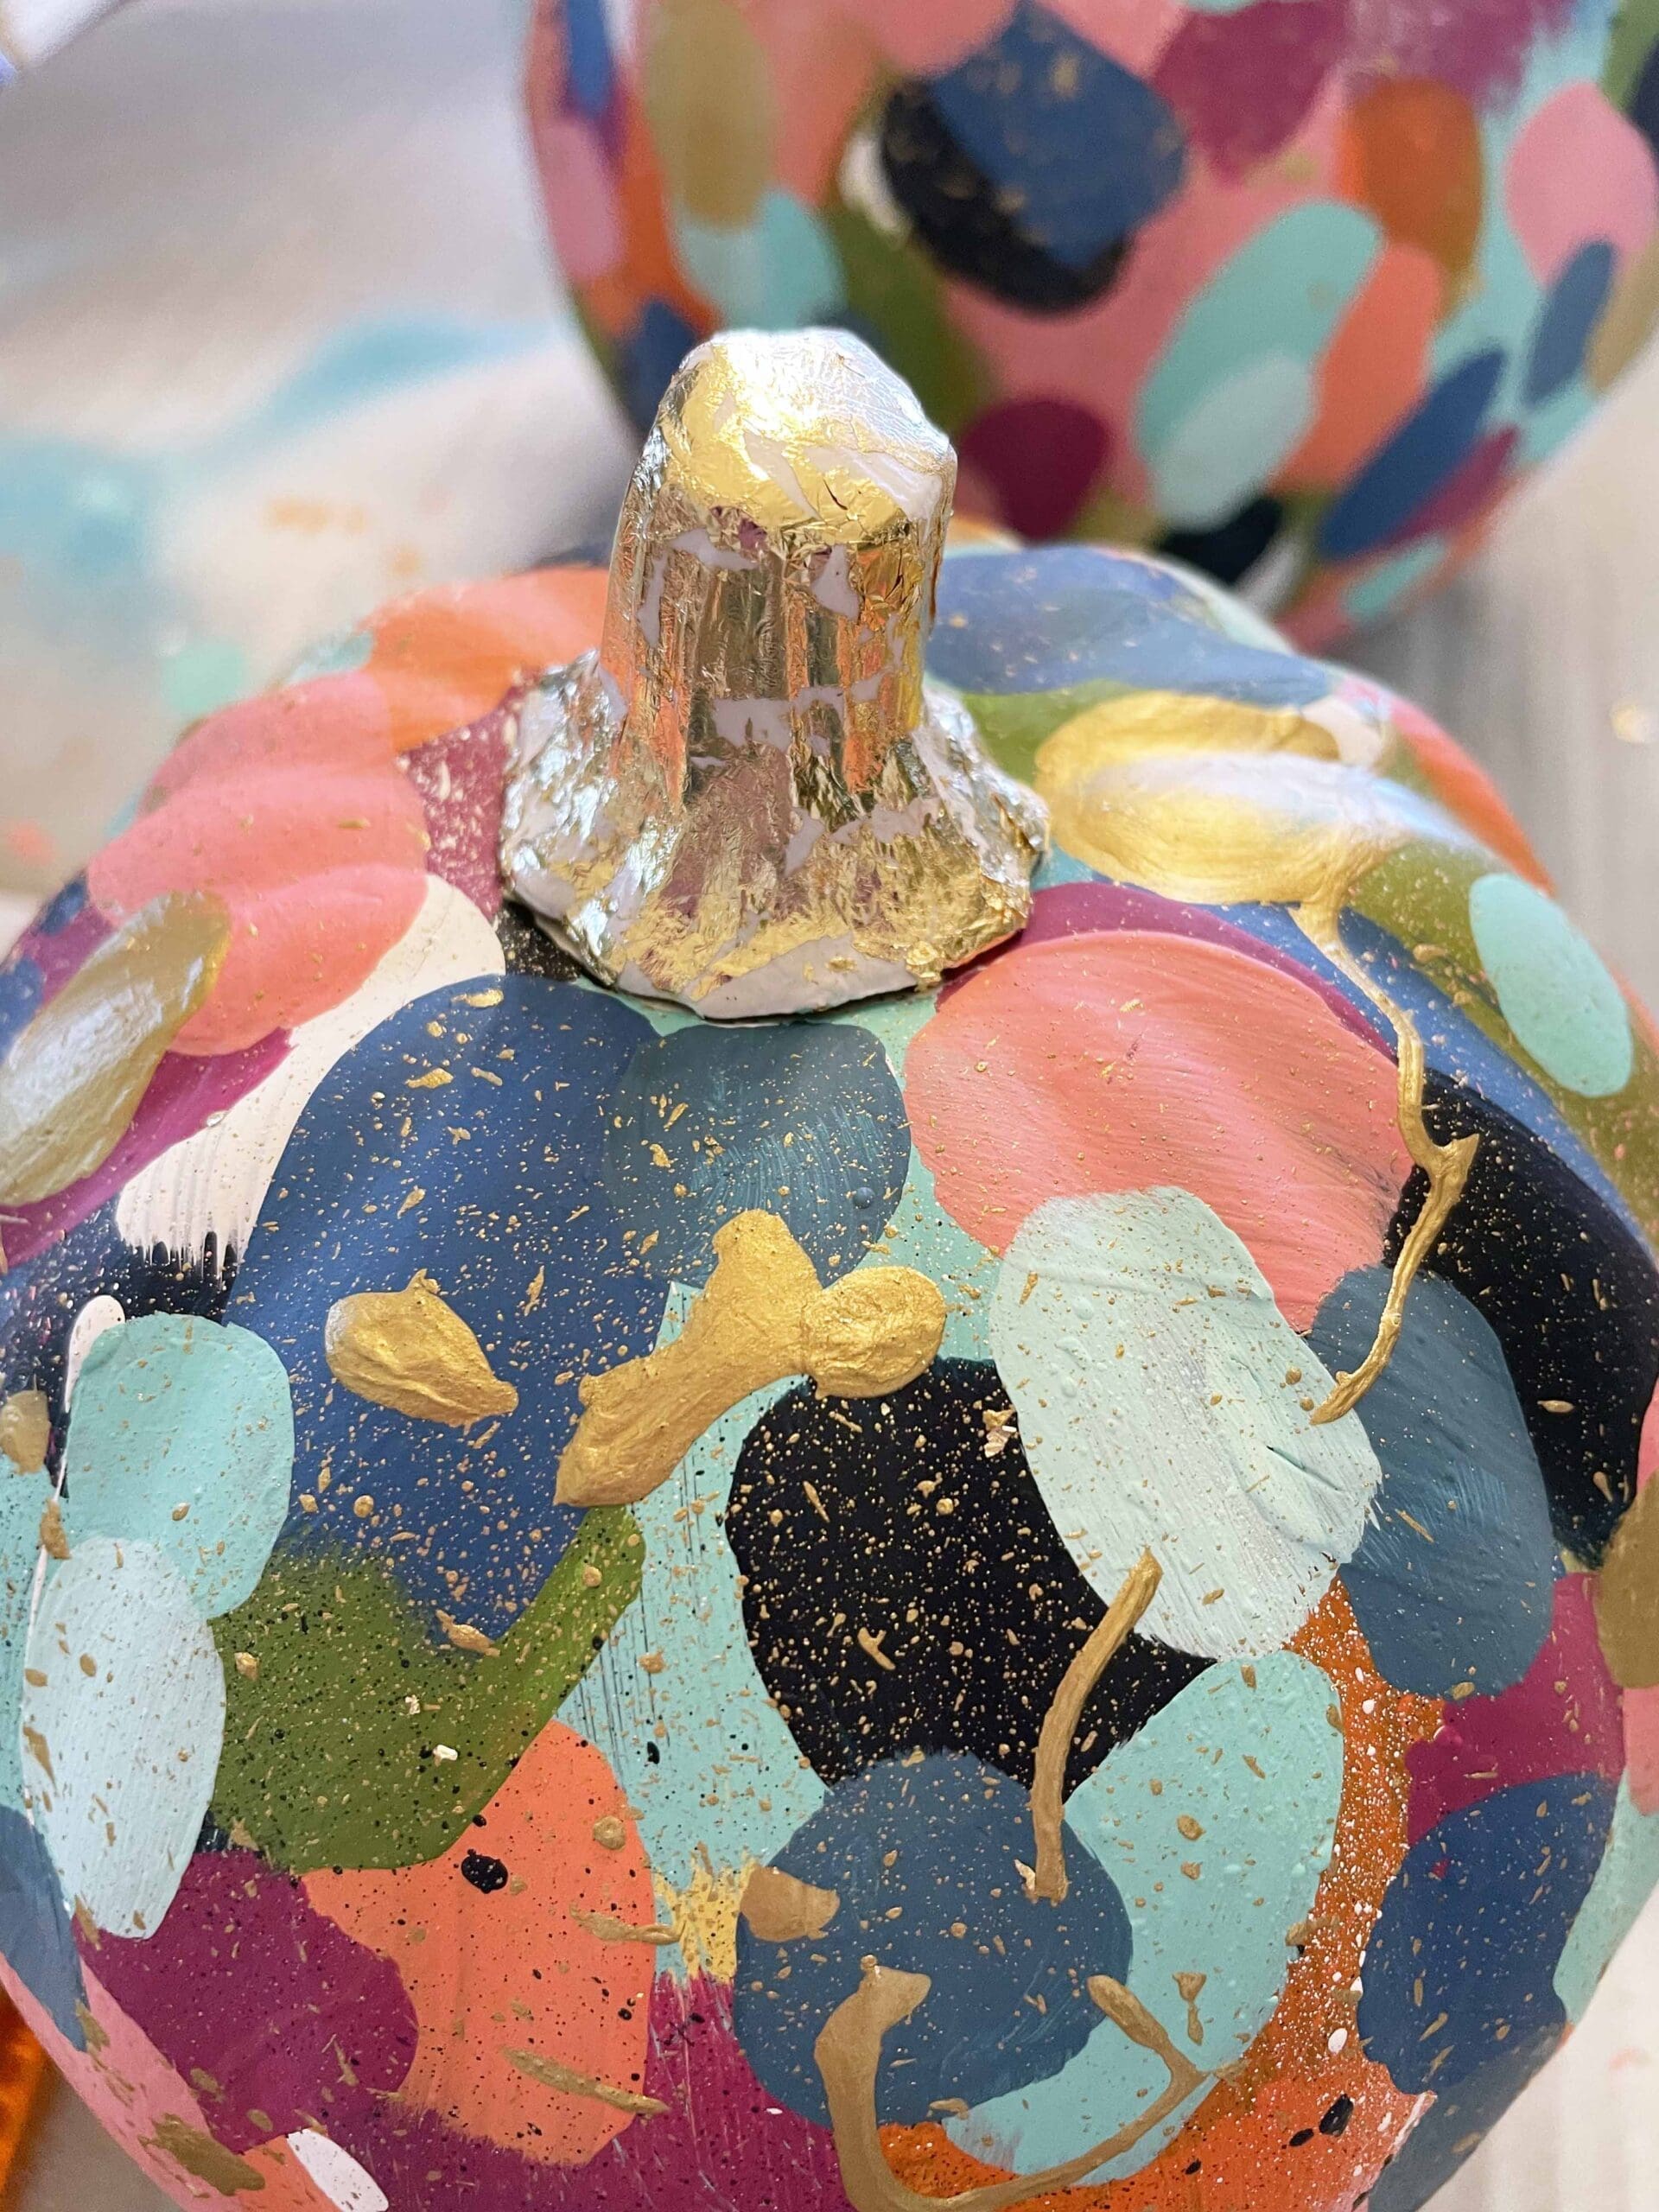
Step 3: Decorate the Stem

Once you have all of your confetti layers in place and you’re happy with how they look, let your pumpkins dry completely. Now it’s time to beautify the stem!
First, add a layer of white paint to cover any confetti paint that made its way onto the stem. Then you have two options: You can simply grab your favorite metallic gold acrylic paint and get to work, OR you can spend a little extra time and add gold leaf.
Full disclosure: Do I like the extra sparkle and texture the gold leaf adds? Yes! Do I think you could get a very similar look and feel by quickly painting the stem gold? Also yes.
However, if you have gold leaf flakes on hand or have the extra time and patience to replicate this look, then here’s how it’s done:
- Clean off your stem and create an easy-to-wipe, draft-free workspace. (If you’ve ever worked with gold leaf flakes before, you’ll understand why this is so important… if you haven’t, then take my advice: When you’re ready to open your gold leaf flakes, turn off any fans, close your doors, and exhale lightly.)
- Brush a light layer of Mod-Podge on one side of the stem. (I found it’s easier to work in small sections rather than the entire stem at once.)
- Using your fingers, gently press the gold leaf onto the Mod-Podge coated portion of the stem. Repeat this process until the entire stem is covered.
- Once the gold leaf is completely dry, use your fingers or a stiff, soft paint brush and gently remove any excess gold leaf. You’ll likely have a crackled look, which may be exactly what you’re going for. If you’d like complete coverage like I have on my pumpkins, then you’ll repeat the process of Mod-Podge, pressing gold leaf, drying, and brushing several more times.
When you have the coverage you’re looking for, cover the final layer in a thin coat of Mod-Podge and let dry. - BONUS: I added a few dots of gold foil flakes on the body of my pumpkins as well — just for an added bit of sparkle! To do this, place a thin dot of Mod-Podge onto the pumpkin, press gold leaf onto it, and repeat until you get the coverage you like. Then add a light layer of Mod-Podge to seal.
Step 4: Seal Your Painted Pumpkins (Optional)

Add a gold-leaf safe clear coat or a coat of Mod-Podge over your completed, fully dried pumpkins. While this is totally optional, it’ll make clean-up much easier in the event that someone gets a bit wild with the sweet potatoes.
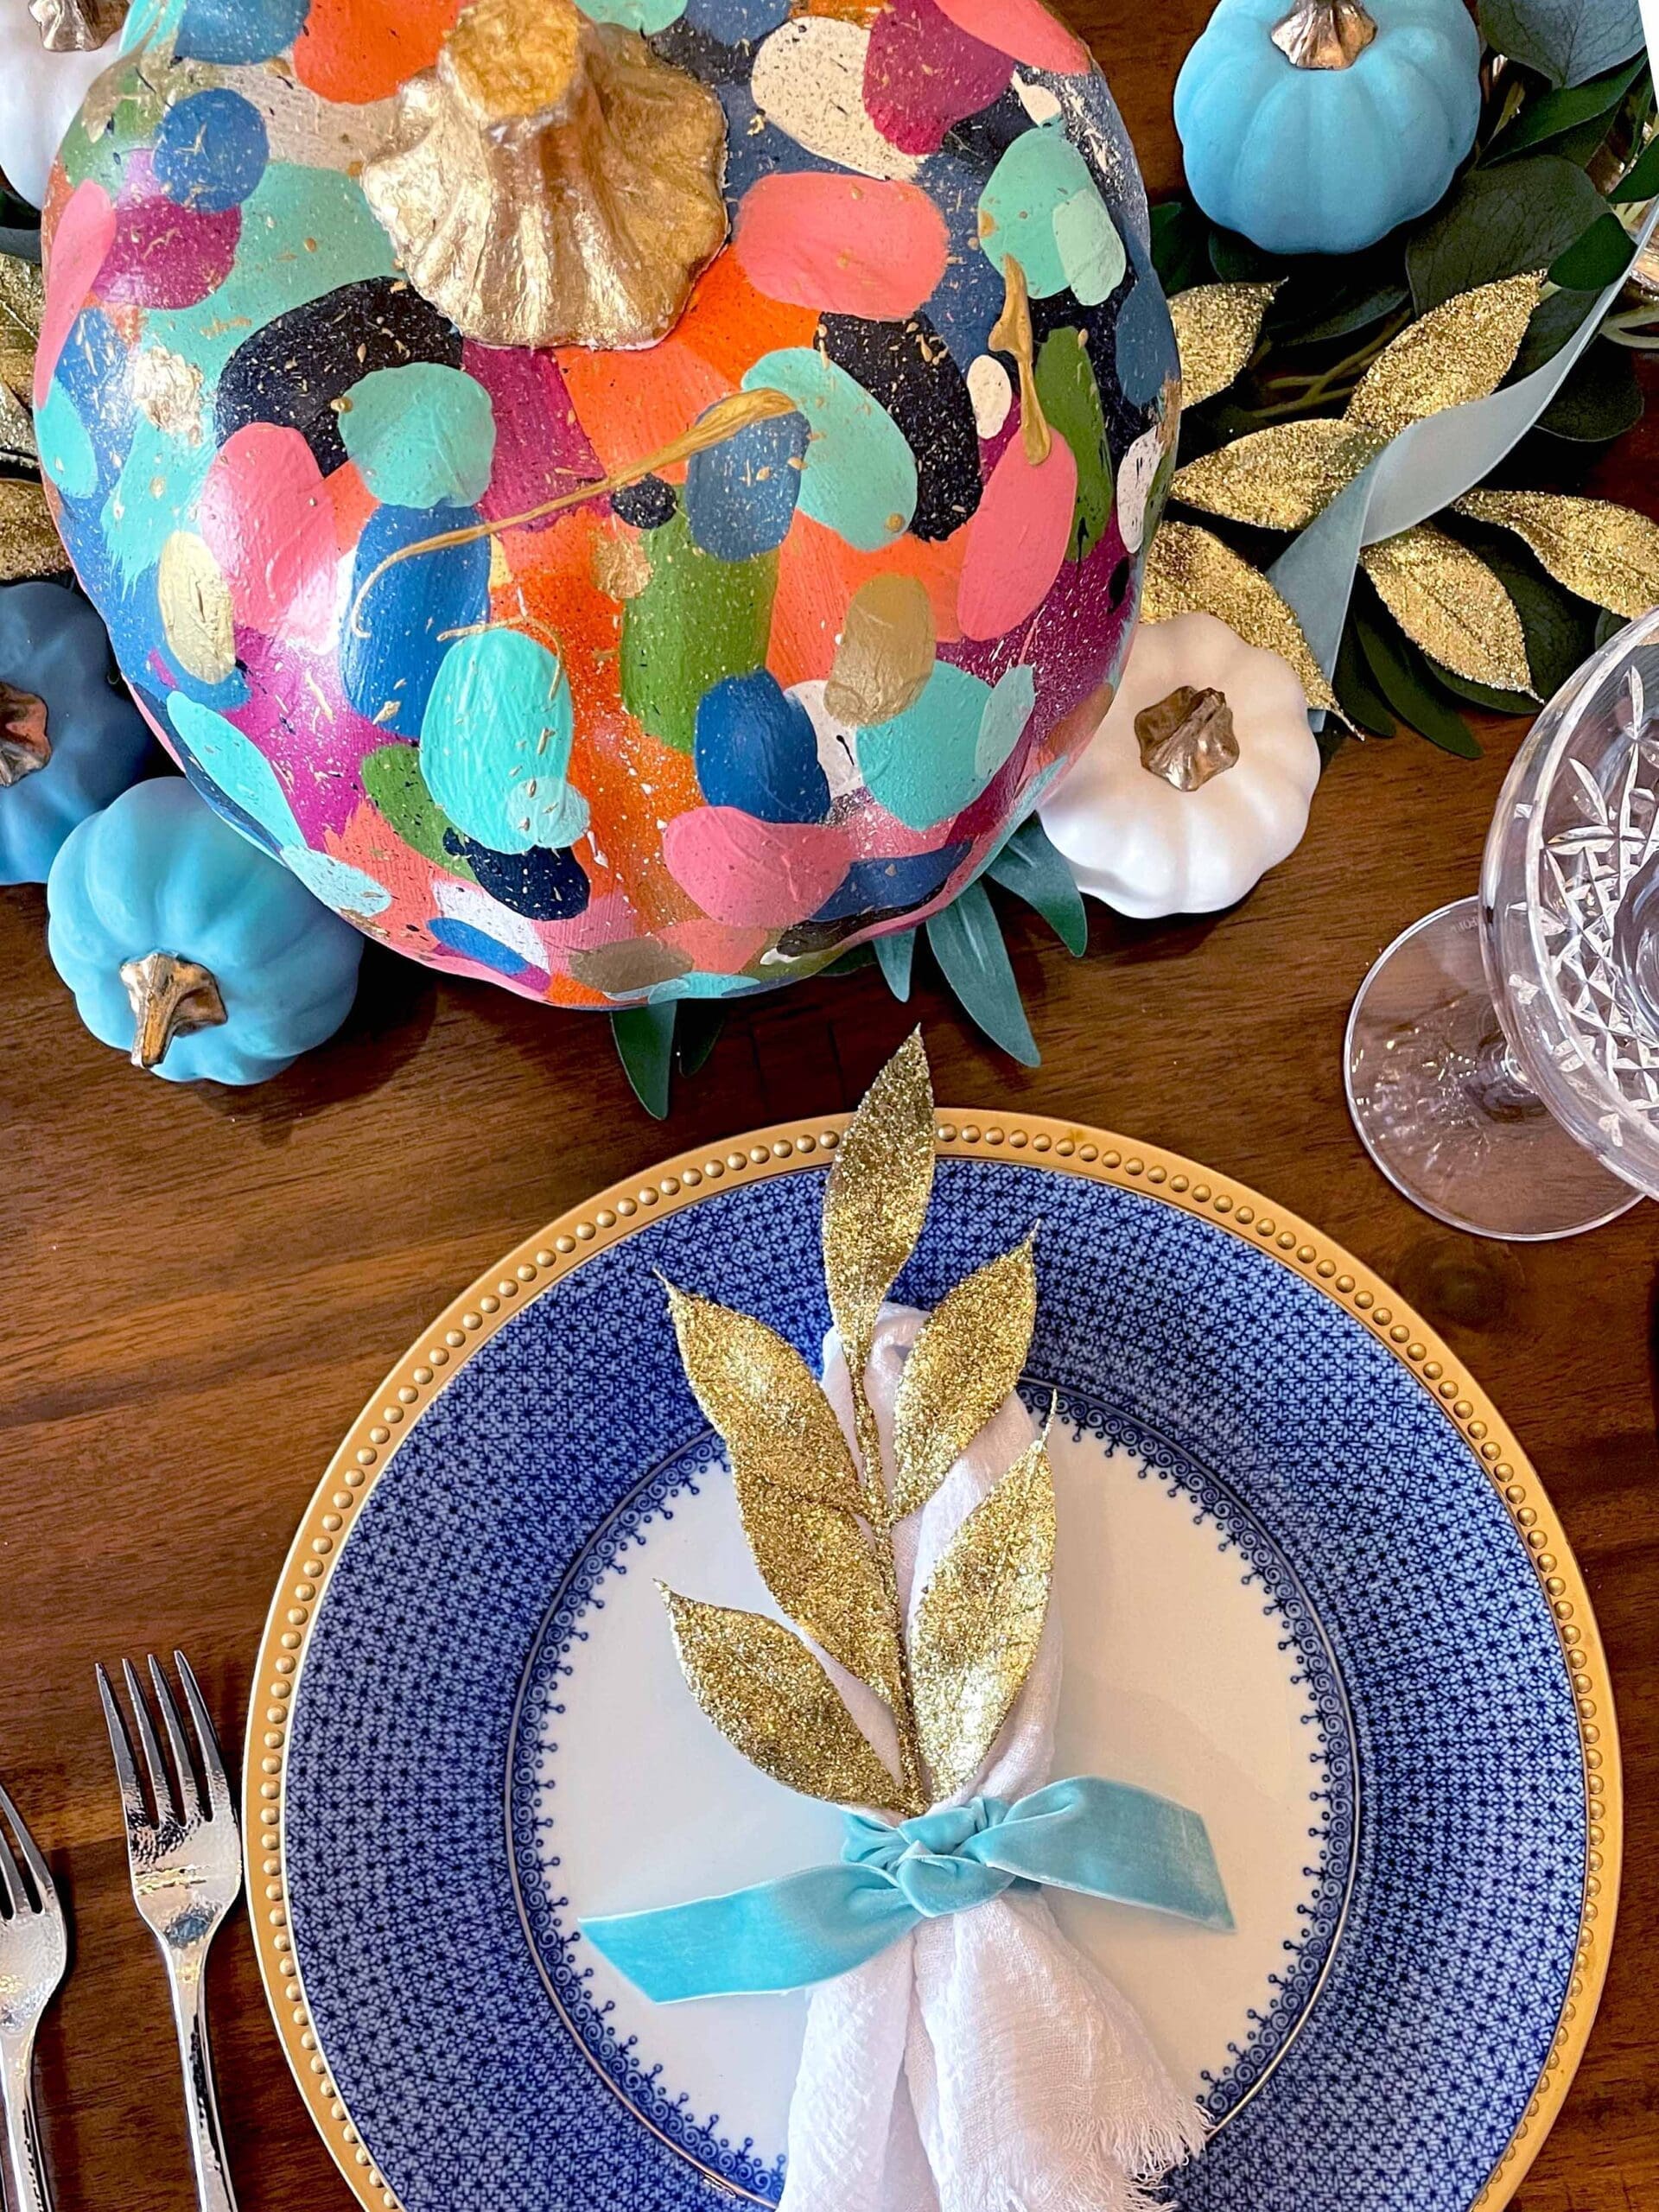
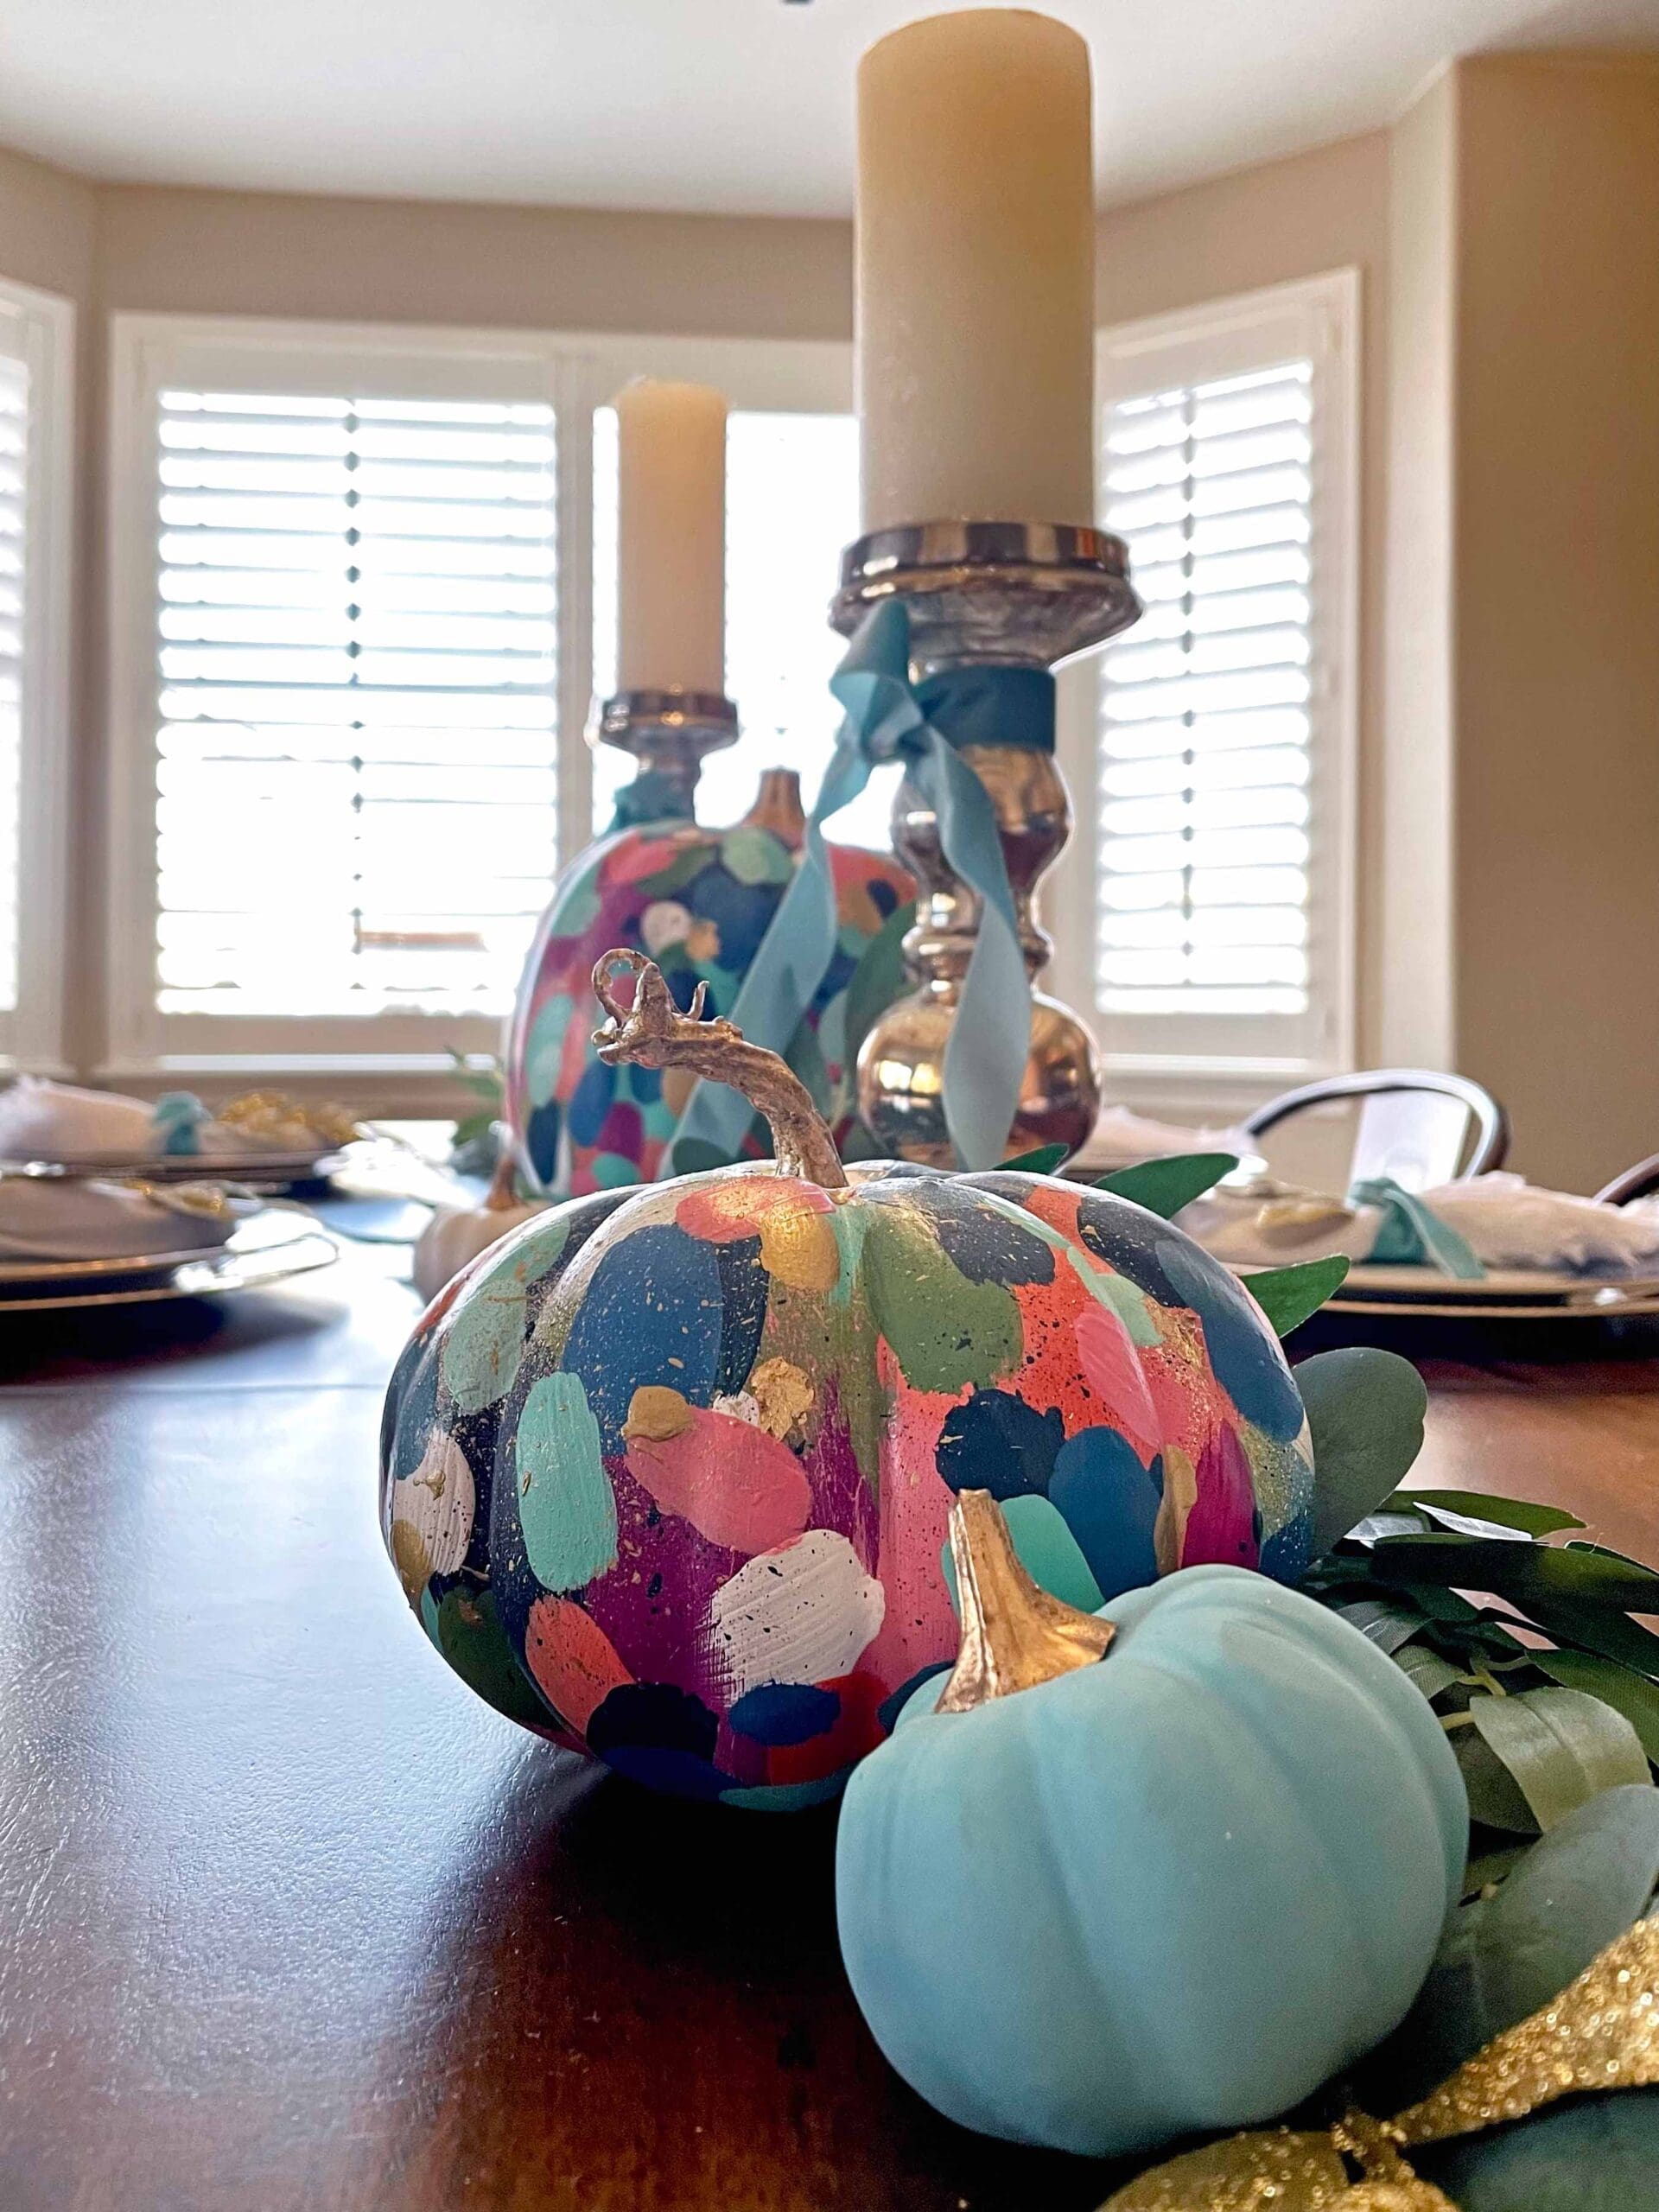
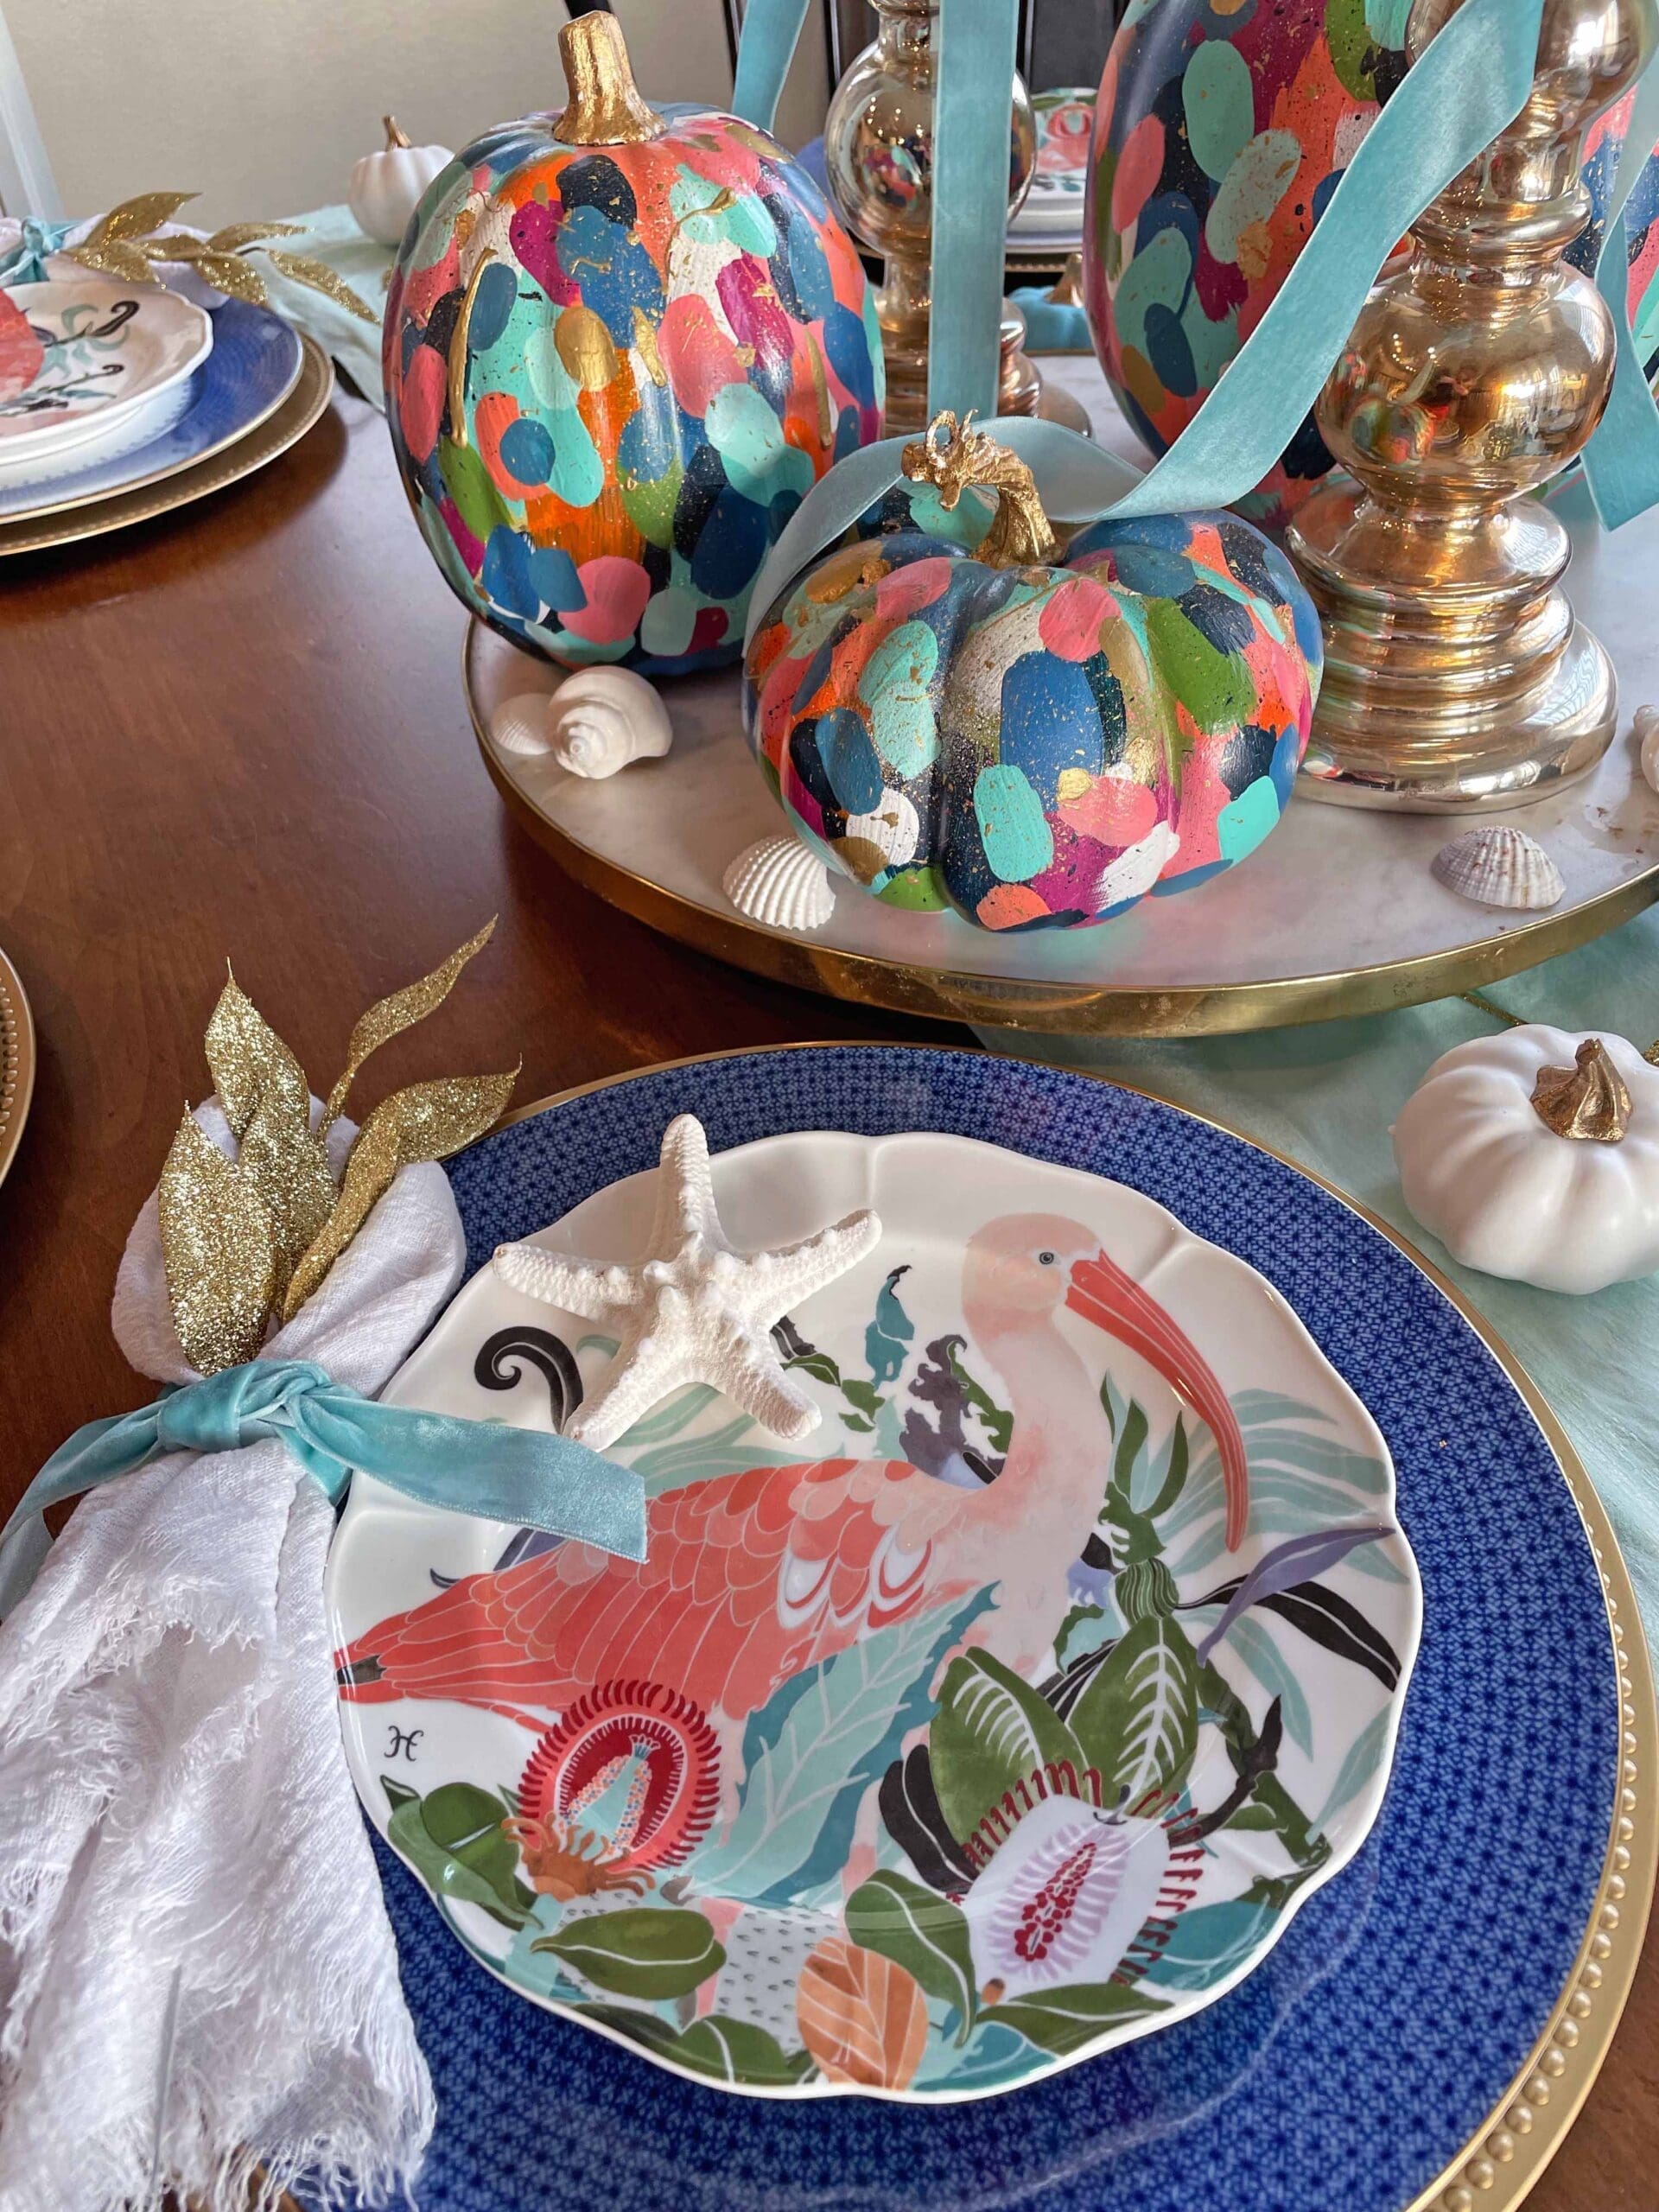
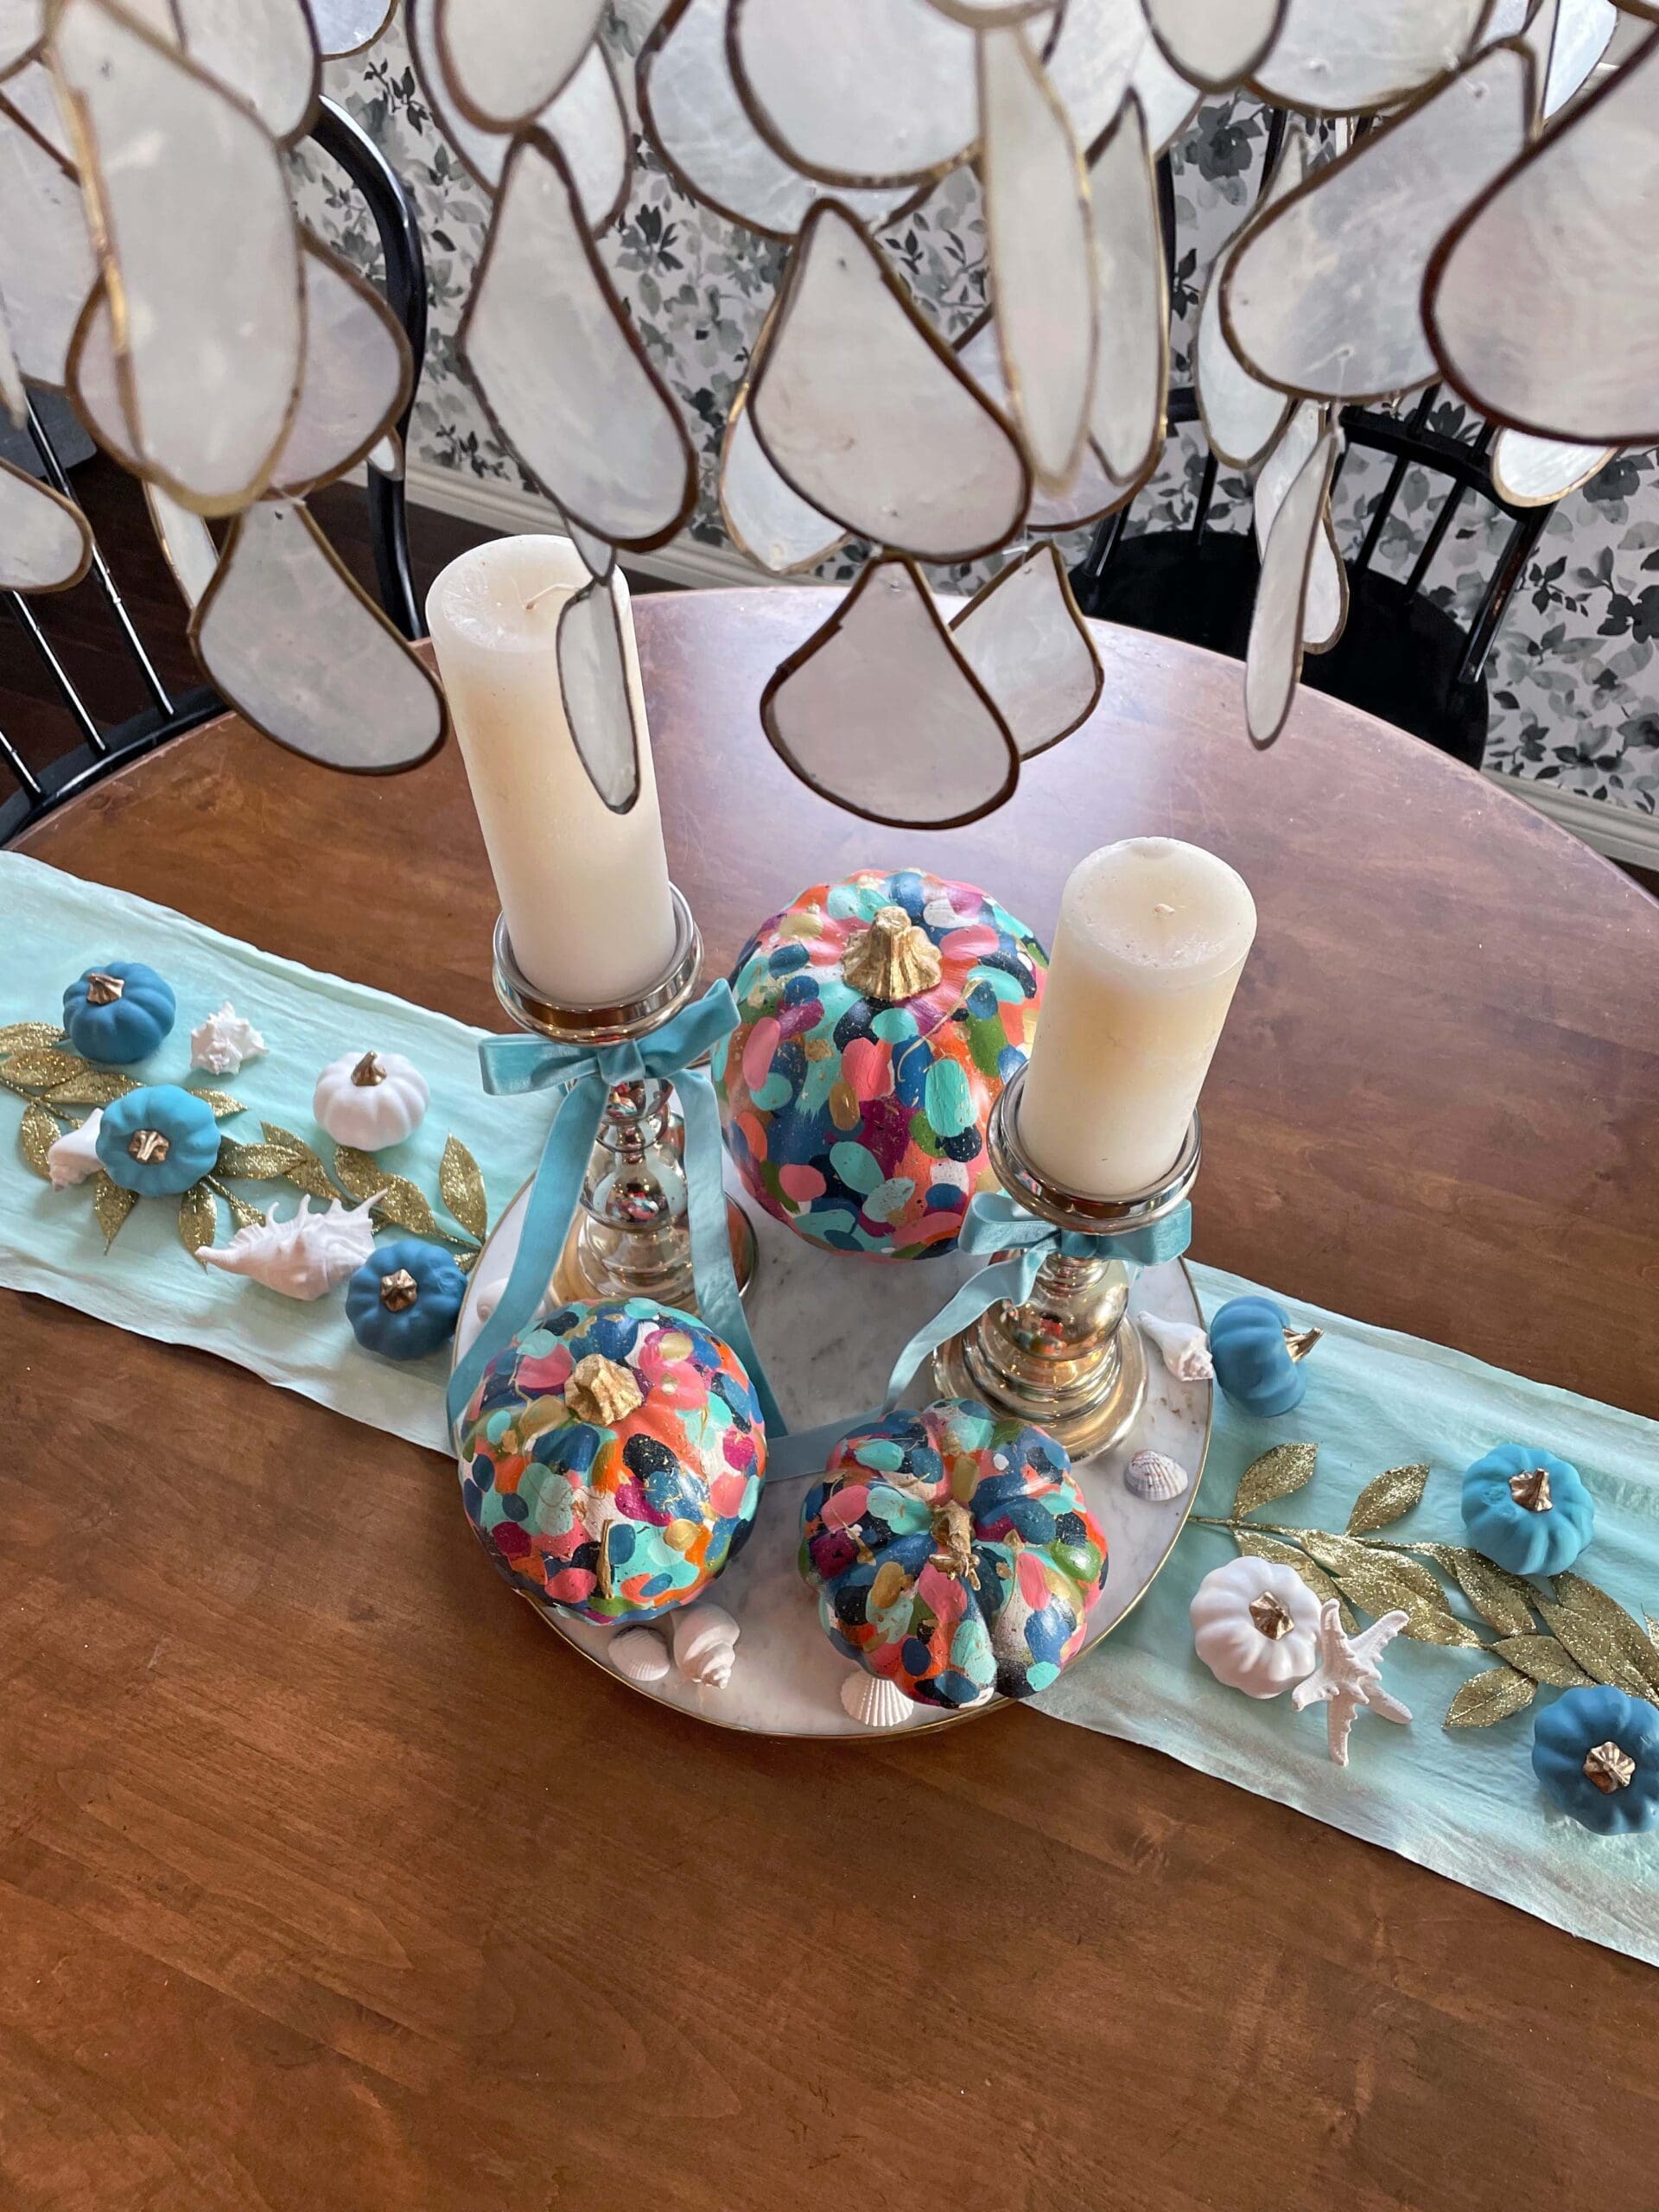
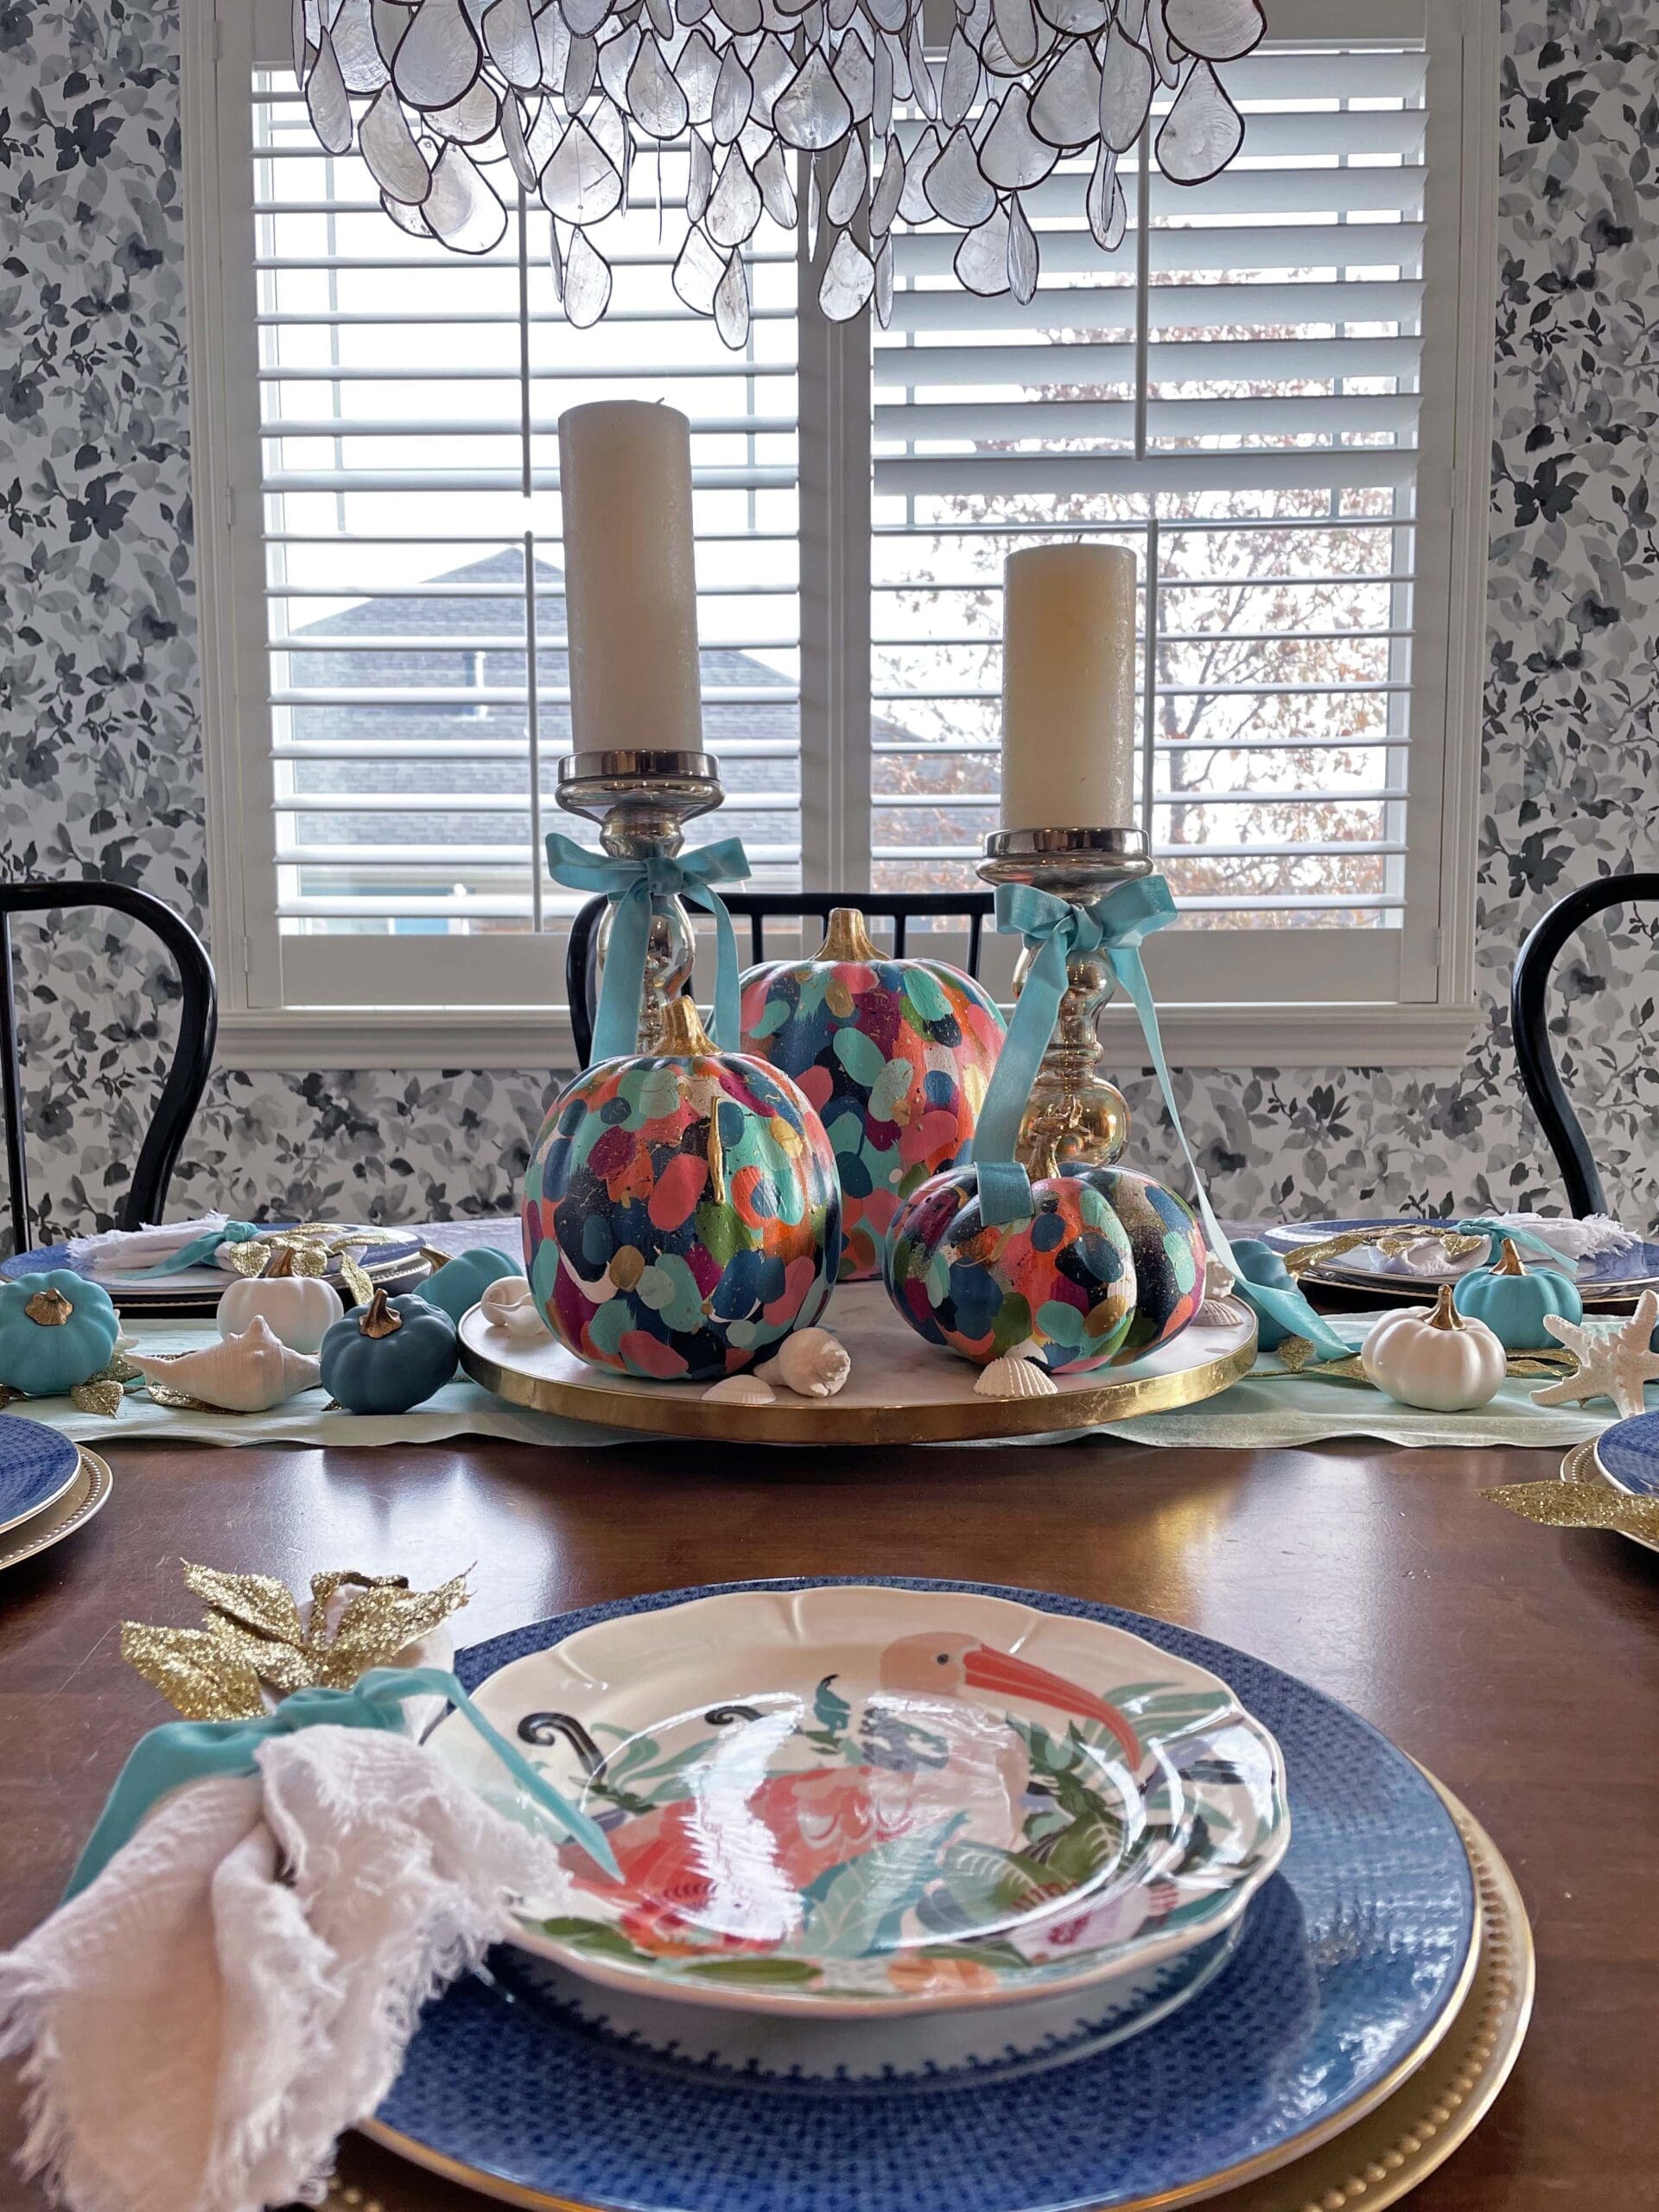
Step 5: Set Your Thanksgiving Table

You did it! Now take your artsy skills a step further and place your DIY Confetti Painted Pumpkins on your Thanksgiving table.
While they look fabulous all on their own, you may want to add some additional flair. These pumpkins are fun in a formal setting or something more casual — I had fun putting together both! If you have a little extra time (or Amazon Prime!) here’s some of the decor I found to coordinate with my colorful confetti pumpkins:
- Eucalyptus and Willow Garland
- Gold glitter leaf-spray stems
- White gauze napkins
- Mini blue and white pumpkins
- Teal velvet ribbon
Happy Thanksgiving!


